
Cry Havoc! Maps
Author: Lutz Pietschker
Version:
2023-01-03
Cry Havoc | Games | Home Page | Links | What's New
The Cry Havoc! Series Mapboards
Cry Havoc! series - Norman Saga - Sherwood - Fan-designed - Unpublished
This is a list of all maps that I am aware of. For PBM play I have introduced a map coordinate system for some of them. Each map is described as
<English name> (<my short name>) [<French name>, <German name>]
Original Cry Havoc! Series Maps
- The Cry Havoc! map set (Standard Games/Eurogames)
- The Siege map set
- The Viking Raiders map set (extra map set of Eurogames edition)
- The "Island Fortress" map set (extra map set with Standard Games edition, is part of the Vikings map set in Eurogames edition)
- The Outremer/Croisade map set
- The Samurai Blades map set
- The Forest (For) [forêt, Wald]
- The Open Field (Ope) [-, Ebene]
- The Ford (Frd) [Le Gué, Furt]
- The Coast No. 2 (Co2) [La Côte No. 2, ??]
- The Templar's Castle (2 sheets) [-, Burg der Templer]
- The Fortified Medieval Town (4 sheets) [Cité Fortifiée, Mittelalterliche Stadt]
- The Dark Blades/Dragon Noir map set
- The subterranean maps of Dragon Noir (Note: These maps have a printed co-ordinate system, similar to my own system described below. They are designed to fit together along both long and short edges to build extensive cave labyrinths.)
- The Guiscard map set
- The Eagle Nest (Eag) [Nid d'Aigle, Adlernest]
- The Lagoon (Lag) [Lagon, Lagune]
- The Jetty half-map (Jet) [La Jetée, Anlegesteg]
- The Staircase half-map (Sta) [L'Escalier, Steintreppe]
- The Reef 1 half-map (Re1) [Le Recif 1, Riff 1]
- The Reef 2 half-map (Re2) [Le Recif 2, Riff 2]
- Overlay pages (Byzantine chapel, Lombard farm, plain, tents, trees, shrub)
- The Diex Aïe map set
- The Anarchy map set
- The Ager Sanguinis map set
- The Montgisard map set
- Extra Maps
Medieval/English Series Maps (Historic'One)
- The Sherwood map set (28x40 cm = about A3 portrait format, i.e. full height/half width maps compared to the standard maps):
Fan-Published Printed Maps
- The Caravanserai (Car) [caravansérail, Karawanserei]
- The Caravanserai (2013 redesign, Ca2) [caravansérail, Karawanserei]
- The Fort of Mont-Briton (Mbr) [batie de Mont-Briton, Burg Mont-Briton]
- The Pass (Pas) [passage, Pass]
- The Fortified Village map set
- The Welsh Castle Arybrynwrthymor (Ary) [château gallois, walisische Burg]
- The Welsh Castle Arybrynwrthymor (2014 redesign, Ar2) [château gallois, walisische Burg]
- The Desert (Des) [désert, Wüste]
- The Hill (Hil) [colline, Hügel]
- The Sheepfold (She) [La bergerie, Schäferei]
- The Woods (Woo) [Le bois, Hain]
- The Islet (Ilt) [L'ilot, Inselchen]
- The Cove (Cov) [crique, Felsenbucht]
- The Beach (Bea) [plage, Strand]
- The River (Riv) [riviere, Fluss]
- The Hamlet (Ham) [hameau, Weiler]
- The Wharf half-map (Whq) [quai, Kai]
- The Bell Tower half-Map (Bel) [tour de la campane, Glockenturm]
- The Crusader Trail (Cru) [chemin des Croisés, Kreuzfahrerpfad]
- The Knoll (Kno) [tertre, Kuppe]
- The Meadow (Mea) [prairie, Wiese]
- Overlay Page: Walls, Scaffolding, Belfry
- Overlay Page: Ships
- Overlay Page: Cross, Hillock, Houses
- Overlay Page: Trees and Woodpiles
- Overlay Page: Hoardings
- Orléans 1429 map set
- The Fortified Saxon (a.k.a. Medieval) Harbour map set (port saxon fortifié)
- The Fortified Crusader Harbour map set (port croisé fortifié)
Fan-Designed Maps Not Published in Print
For now, please look up the Cry Havoc fan page for these maps: page 1, page 2. Printable downloads are available for most of them.
Map Co-Ordinate System
The main problem in making Cry Havoc! PBM-able is that initially no mapboard carried coordinates. We have to find a way to supply them, and that's what the following text is about:
Starting with "Viking Raiders", some mapboards of the Cry Havoc! game system feature a map grid reference in form of hex columns designated A to Y (a slightly different system was described in one "Outremer" scenario). Applying the "Viking Raiders" system to the other mapboards, we may establish the following system:
First, mark one hex row of each mapboard you intend to use in PBM Cry Havoc! with the ID letters (one might even consider to mark each individual hex with it's full coordinate- it is highly recommended, in fact).
The hex row with the ID letters shall normally be one of the longer board edges. To find the "ID letter mapboard edge" just lay the board out so that the board name is readable for you. If the board is now in landscape format to you, the upper edge (the one away from you) is the ID letter edge and is lettered A to Y from left to right in the full and half hexes of this edge as described below. Be sure to mark the first full hex of the edge as hex "A"!
If the mapboard is in portrait format when you can read the name, turn it 90 degrees counter-clockwise, and again the now-upper edge is the ID letter edge. (The mapboard name is now readable from the right-hand side.)
(Exceptions: the small maps "Cape 1" and "Cape 2" from Vikings and the 4 small maps from Guiscard (Jetty, Staircase, Reef 1, Reef 2) are left with the small sides top and bottom so they fit into the hex pattern of the normal-sized maps, see detailed description below. The same is true for the subterranean maps from Dragon Noir which carry a printed co-ordinate system anyway.)
When you have laid out the map sheet apply the co-ordinates as described below:
- Each normal-sized mapboard has columns A to Y and rows 1 to 16 (or 17). Columns are straight hex columns, rows zigzag up and down by one half hex. Column A is always the first column that is made up of full hexes. The half-hex column left of A shall be called AA, if necessary. The ID letters are at the topmost edge of each mapboard, from left to right, readable when looking from the bottom edge.
- Hex row 1 is the row containing the ID letters; it is made up of the full and half hexes along the mapboard edge. Thus, columns starting with a full hex (A, C, E, etc.) count 1 to 16, those starting with a half-hex (B, D, F, etc.) 1 to 17 on a normal mapboard.
- Coordinates are always in reference to one single mapboard, not taking the orientation of other mapboards into account, nor the mapboard configuration of the scenario. Thus it may happen that in a multi-mapboard scenario A to Y runs from east to west on one board and from west to east, or even south to north, on another.
- To address hexes that are made up of 2 half-hexes of mapboards butted together the coordinates of either mapboard may be used, but the mapboard name must be given with the coordinates in possible cases of doubt.
- If necessary, each coordinate shall be preceded by the (abbreviated) name of the mapboard (see below). If a board does not have a name of its own (as in the case of parts of the Templar's Castle and the Fortified Medieval Town maps), the name of a prominent terrain feature shall be used as the mapboard name for all purposes.
- Printed coordinates supersede the system given here. Attention: Different versions of the game may have different printed coordinates!
To simplify things, I applied the above rules to all mapboards I know. So, below is a description of grid coordinates for all those mapboards, with grid reference examples. I use the English map names throughout, even if some of the maps have been first published by Jeux Descartes Eurogames (France). The abbreviated mapboard name is written in (parentheses), the French and German map names in [italics in square brackets], and the name of the game the map appeared in originally is in <angled brackets>. Before actually scribbling away on the mapsheet, please verify that you understood everything as I meant it by looking up the example coordinates!
Back to index
List of Mapboards
The Village (Vil) [village, Dorf] <Cry Havoc>:
The map shows a small village made up of some cottages with huts and courtyards. (Don't believe the graphics that imply the huts are made of stone- most medieval houses were daub-and-wattle, or wooden framework constructions at best.)
ID letters at side 3 (EX: door of Building 1 is D13, door of Building 2 in i11)
Back to index
The Crossroads (Crs) [??, Kreuzung] <Cry Havoc>:
A plain with a water pool, a patch of brushes, and a wooded hillock that is ideal for ambushes.
ID letters at side 7 (EX: the pool is in N5/o3/o4/o5/P4/P5, the tree beside the hillock in T12/T13/U12)
Back to index
The Eagle Nest (Eag) [Le Nid d'Aigle, Adlernest] <Guiscard>:
A stretch of sandy coast with a small cliff side and a path that leads to an elevated stone tower with palisades.
ID letters at side 1 (EX: the tower entrance platform is in J10, a single-hex stair in G7)
Back to index
The Lagoon (Lag) [Le Lagon, Lagune] <Guiscard>:
A wet, swampy stretch of coast with a few trees and dry hillocks.
ID letters at side 1 (EX: a group of rocks is in D3, D4 and E3; the word "Marsh" is printed in N8)
Back to index
The Jetty (Jet) [La Jetée, Anlegesteg] <Guiscard>:
A map strip that connects to the right side of the Eagle Nest and the Lagoon: A wooden jetty on a sandy beach.
ID letters at side 1; this is an exception insofar as they are on the short side of the map but necessary to stay in the hex pattern of the maps (EX: the northern tip of the jetty is in D4)
Back to index
The Staircase (Sta) [L'Escalier, Steintreppe] <Guiscard>:
A map strip that connects to the left side of the Eagle Nest and the Lagoon: A stair leading up from the beach through cliff and rocks.
ID letters at side 1; this is an exception insofar as they are on the short side of the map but necessary to stay in the hex pattern of the maps (EX: the stair hexes are in C9, C11 and D11)
Back to index
The Reef 1 (Re1) [Le Recif 1, Riff 1] <Guiscard>:
A map strip that connects to the right side of the Eagle Nest and the Lagoon: Sandy beach and cliffs with a rocky promontory.
ID letters at side 1; this is an exception insofar as they are on the short side of the map but necessary to stay in the hex pattern of the maps (EX: a few single rocks are in C3, the cove ends in B8/B9)
Back to index
The Reef 2 (Re2) [Le Recif 2, Riff 2] <Guiscard>:
A map strip that connects to the left side of the Eagle Nest and the Lagoon: Sandy beach and cliffs with a rocky promontory.
ID letters at side 1; this is an exception insofar as they are on the short side of the map but necessary to stay in the hex pattern of the maps (EX: a few single rocks are in D2, the cove ends in D11/D12)
Back to index
The Motte & Bailey (Mot) [la motte castrale, Turmhügelburg] <Diex Aïe>:
A typical Norman castle as built in Normandy, England and wherever 11th-century Normans felt the need for some security.
ID letters at side 1 (EX: the gate hex is in I3, the middle of the tower in R9)
Back to index
The Woodbridge (Wob) [le pont de bois, Holzbrücke] <Diex Aïe>:
A stream winding through open terrain; a wooden bridge spans the river.
ID letters at side 1 (EX: the middle of the bridge is in I11, the middle of a large tree in W13)
Back to index
The Ditch (Dit) [le fossé, Senke] <Diex Aïe>:
A marshy ditch cosses this map, in otherwise open terrain. One side of the ditch slope more steeply than the other. Ideal ambush terrain.
ID letters at side 1 (EX: the middle of a large tree is in C6, a solitary path of marsh in N8)
Back to index
The Saxon Village (Dit) [village Saxon, sächsisches Dorf] <Diex Aïe 2>:
This map is a ready-made Saxon village which formerly required the use of many overlays. It shows a village with a great hall and 5 houses/huts plus a few trees on flat ground.
ID letters at side 1 (EX: the fireplace of the great hall is in M7, its entrance in P6)
Back to index
The Campaign Maps <Diex Aïe>:
These maps are used for campaign games; one shows Kent, the other (printed on the back) shows Yorkshire.
These maps show named villages, and they have a natural orientation (North is up). Locations are designated by reference to one village, the compass point and the distance.
Examples: A forest is 1 hex south-west of Boughton (and 4 hexes north-east of Udimore); Hunsingore is 2 hexes east of Plompton (and 4 hexes north-west of Stillingfleet).
Back to index
The Norman Keep (NoK) [le donjon normand, Normannenburg] <The Anarchy>:
A stone castle with a crenellated wall, several square towers and a massive keep that is accessible only via stairs from the courtyard.
ID letters at side 1 (EX: the stairs to the keep are in H7/I7)
Back to index
The Priory (Pri) [le prieuré, Priorei] <The Anarchy>:
A massive stone church with transepts, a chancel and a nave plus adjoining monastic buildings, including a quiet patch of green surrounded by cloisters.
ID letters at side 1 (EX: a small fountain basin is in J12)
Back to index
The Creek (Cre) [le ruisseau, Bach] <The Anarchy>:
A small creek that winds through the upper part of the map and empties into some larger body of water. It has a ford and is surrounded by a few trees and small hills. There is a bit of a beach at the mouth of the creek. The lower part of the map is completely clear, good to build a camp (or to attack it with cavalry).
ID letters at side 1 (EX: the words "gué/ford" are printed in H6, the trunk of a big tree is in R7)
Back to index
The Campaign Map <The Anarchy>:
This map is used for campaign games; it shows a part of western England, roughly from Bath in the south-west to Oxford in the north-east.
The map shows named villages, towns, castles and monastries, and it has a natural orientation (North is up). Locations are designated by reference to one village, town, monastry or castle, the compass point and the distance.
Examples: A forest is 3 hexes north of Marlborough Castle (and 1 hex south-east of Swindon); Corsham Priory is 3 hexes north-east of Bath (and 3 hexes north of Trowbridge Castle).
Back to index
The Crusader Castle (CrC) [Château Croisé, Kreuzfahrerburg] <Ager Sanguinis>:
Two castle buildings on a hill are separated by a trench and connected by a wooden bridge, the classic layout of a two-part medieval castle.
ID letters at side 1 (EX: the word "Cuisine" is printed in F6, a one-hex staircase is in T10)
Back to index
The Village of Outremer (Vio) [Village d'Outremer, Dorf in Outremer] <Ager Sanguinis>:
A few houses, including a small "palace", a well and a few palm trees make up this small desert village.
ID letters at side 1 (EX: the word "Palais" is printed in F3, a well is in T13)
Back to index
The Plateau (Pla) [Plateau] <Ager Sanguinis>:
A small lake in flat terrain with a few palm trees, with a sunken stone field between slopes.
ID letters at side 1 (EX: the word "Oasis" is printed in E4, the trunk of a palm tree is in I14)
Back to index
The Campaign Map <Ager Sanguinis>:
This map is used for campaign games; it shows a part of Syria, roughly from Aleppo in the North-East to Laodicea in the South-West.
The map shows named villages, towns and castles, and it has a natural orientation (North is up). Locations are designated by reference to one village, town or castle, the compass point and the distance.
Examples: A forest is south-east of Termanin (and north-east of Al-Atarib).
Back to index
Overlay Page: Tents [tentes, Zelte]:
This overlay contains several tents.
Back to index
The Crac des Chevaliers (Pla) [Crac des Chevaliers, Krak des Chevaliers] <Montgisard>:
This is a double-sized map that shows the famous Crac des Chévalier, a huge crusader castle. I has multiple defensive ring walls and a plinth (glacis). It also has an aqueduct and a cistern.
ID letters at sidea D (EX: the central staircase of the "Tour du commandant" is printed in R12, the word "Galerie" is printed in P22)
Back to index
The Vaulted Ramp (Cvr) [rampe voûtée, unterirdische Rampe] <Montgisard>:
This is sort of an "underlay" to the Crac des Chévaliers: A subterraean ramp that allows access to the castle from the main gate to the inner ward. It winds around a tunnel that can also be accessed from the inner ward and that allows to fight intruders who are on the ramp itself.
The hex designations follow those of the castle itself.
Back to index
The Horn (Hor) [corne, Horn] <Montgisard>:
A steep rocky hillock encircled by two rings of slopes, but easily accessible through a gentle slope from the East side.
ID letters at side 1 (EX: the leftmost rock hex is in G10, the trunk of a palm tree is in W9)
Back to index
The Wadi (Wad) [l'Oued, Wadi] <Montgisard>:
A sandy path runs between slopes, overlooked by a small hill, with a few palm trees and stone fields.
ID letters at side 1 (EX: the trunk of a palm tree is in C5, another one in V13)
Back to index
The Campaign Maps: Judea and Galilee <Montgisard>:
These maps are used for campaign games; they show Judea (northern Palestine, from Beirut to Lake Tiberias) and Galilee (southern Palestine, from Jaffa to Gaza, including the Dead Sea).
The maps show named villages, towns and castles, and they have a natural orientation (North is up). Locations are designated by reference to one village, town or castle, the compass point and the distance.
Examples: On the Judea map, a forest is 3 hexes north-east of Mirabel.
Back to index
The Cave Fortress (CaF) [Cave-Forteresse, Höhlenfestung] <extra map/Historic'One>:
Two towers joined by a palisade that back up against a mountain or hill with caves, including a cave chapel, based on the cave at El Habis Jaldak. Not sure if the caves would connect to the Dwarf's Cave set from the Dragon Noir games.
ID letters at side 1 (EX: the staircase of the west tower (near "Rebord Ouest") is in D14)
Back to index
The Inn (Inn) [L'Auberge, Gasthaus]<Sherwood, 28x40 cm = full-height/half-width>:
This map shows 3 small buildings: A very small inn, a small storage house and a forge with an anvil outside.
ID letters at side 1 (EX: a bedroom window looks out at D06, a pail next to the anvil is in H12)
Back to index
The Wood's Edge (WoE) [L'Orée du Bois, Waldrand] <Sherwood, 28x40 cm = full-height/half-width>:
A few bushes and trees in loose formation, as you may find them on the edge of a dense forest.
ID letters at side 1 (EX: the trunks of the topmost trees are in B04 and E06)
Back to index
The Gulch (Gul) [Ravin, Schlucht] <Sherwood, 28x40 cm = full-height/half-width>:
A cut (sunken road) runs between two wooded slopes – classic ambush terrain.
ID letters at side 1 (EX: the trunk of the leftmost tree is in B10, the slope has a "knee" in G11)
Back to index
The Forester's Cottage (FoC) [La Maison du Forestier, Forsthaus] <Sherwood, 28x40 cm = full-height/half-width>:
The small house of a forester or "shire reeve", with just 1 room and a small walled courtyard, is surrounded by a few trees and shrubs.
ID letters at side 1 (EX: the entrance to the courtyard is in C09)
Back to index
The Camp (Cmp) [??, Lager] <Siege>:
A military camp, some tents on a 2-level-hill, partly surrounded by a trench.
ID letters at side B (EX: a round, blue-white tent with red roof is in K8, a one-hex-long trench in L13)
Back to index
The Castle (Cas) [??, Burg] <Siege>:
Actually, a very small castle, something like a border post, or the strongpoint of a local noble. Having no living quarters or stables, it's certainly not meant to live in.
ID letters at side F (EX: the winch is located in F9, the stair to the keep in Q9/Q10).
Remark: hex G6 is a case of doubt, it is not clear whether it is at level 0 (accessible from the courtyard G7, but not from the battlement) or at level 1 (accessible from the battlement H7, but not from the courtyard). I prefer the first alternative, since otherwise the gate towers would have different heights. Players should decide which way they want to play it before setting up.
Back to index
The Sea (Sea) [mer, Meer] <Viking Raiders / Vikings> (name is not printed on the mapboard, it is the all-blue one):
Just plain open sea, good to fight naval encounters, or as an approach to the coast.
ID letters at side 2 (EX: the words "Side 2" are in M1, the "1" of "Side 1" in A8)
Back to index
The Coast (Coa) [??, ??] <Viking Raiders>:
Three sides of open water, on the third Shingle Bay, a stretch of pebbled beach, enclosed by a rocky mole and a cape crowned by a sturdy look-out tower and a hut, probably the shack of a local fisherman. (The map is not quite compatible to the newer coast and cape maps.)
ID letters are printed at side 1 (EX: the last mole hex is in Y12, the stair/center hex of the look-out tower in E7)
Back to index
The Watchtower (Wtw) [Tour de Guet, Wehrturm] <Vikings>:
Two sides of open water, a beach with two huts and a fortified round, ground-level tower. Compatible to the cape maplets.
ID letters at side 1 (EX: the middle of the watchtower is in C12, trees are in K15 and Q14)
Back to index
The Abbey (Abb) [L'Abbaye, Abtei] <Vikings>:
Two sides of open water, a beach with three huts and a small stone church- just what the Vikings liked to find when they visited a foreign coast! Compatible to the cape maplets.
ID letters at side 1 (EX: the altar is in C9, two small trees are in o11 and Q16)
Back to index
The Cape 1 (Ca1) [Promontoire 1, Kap 1] <Vikings>:
Two sides of open water, and a narrow strip of beach. Compatible to the beach/coast maps (except the rocky map "The Coast").
ID letters at side 1; this is an exception insofar as they are on the short side of the map but necessary to stay in the hex pattern of the maps (EX: the slope line runs from AA7, A7-A12, B13-B16 to C16)
Back to index
The Cape 2 (Ca2) [Promontoire 2, Kap 2] <Vikings>:
Two sides of open water, and a narrow strip of beach. Compatible to the beach/coast maps (except the rocky map "The Coast").
ID letters at side 1; this is an exception insofar as they are on the short side of the map but necessary to stay in the hex pattern of the maps (EX: the slope line runs from F7, E7-E13, D14-D16 to C16)
Back to index
The Watering Hole (Wat) [??, Wasserstelle] <Outremer / Croisade>:
A pool with a few trees and palm trees growing near it, and a small hillock.
ID letters are printed at side 1 (EX: a small spiky bush is in M5, two bushes in C4/D4)
Back to index
The Olive Grove (Olv) [??, Olivenhain] <Outremer / Croisade>:
A pattern of olive trees, surrounded by rows of trees (hedges?).
ID letters are printed at side 1 (EX: there is a big tree around R3, and one straight line of trees extends from W4 to W15)
Back to index
Outremer Campaign Map: Palestine (PAL) <Outremer>:
A map of Palestine for Crusade campaign games, in the scale of 20 miles to a 25-mm-hex.
ID letters should be written on the north edge (EX: Tarsus is in E2, Mamistra in H1, Azaz in L3)
Back to index
The Village of the White Dragon (Drg) [??, Dorf des weißen Drachen] <Samurai Blades>:
Four huts, three small rice paddies, and on one short map edge some trees.
ID letters at side 4 (EX: The door of the smallest building is in T7/T8, and the largest rice paddy is in N11/o10-o11/P10-P12/Q10-Q11/R11)
Back to index
The Temple (Tem) [??, Tempel] <Samurai Blades>:
A temple and a Tori gate, separated from two huts by a small stream with a bridge.
ID letters at side 4 (EX: The Tori hexes are U12 and V13)
Back to index
The Forest (For) [??, Wald] <additional map>:
Many trees, some of them of impressive size, with few paths between. Bad fighting terrain for mounted characters!
ID letters at side 12 (EX: an isolated shrubbery is in X4/X5, and an isolated big tree in and around D3)
Back to index
The Open Field (Ope) [Plaine, Ebene] <additional map>:
Wide, open plain, with only a few brushes and small trees.
ID letters at side with printed map name (EX: a small tree is in B13, a bigger tree in U6/V6/V7)
Back to index
The Ford (Frd) [Le Gué, Furt] <additional map>:
Open plain, with a river running lengthwise through the map and (you guessed it) a ford in the middle.
ID letters at side 4 (the side with printed map name) (EX: small trees are in H4, P15, R16, S2 and X10)
Back to index
The Coast No. 2 (Co2) [La Côte No. 2, ??] <additional map>:
One side of open water, an empty beach with a few brushes and trees. Compatible to the cape maplets.
ID letters at side with printed map name (EX: The cliff line runs across the map from AA7, A6, B7 to Y7, Z7; a solitary brush hex is in G12)
Back to index
The Templar's Castle Map Set (2 maps)
The Templar's Castle (TCs) [chateau du Templiers, Burg der Templer] <additional map>:
A strong castle with an emphasis on military usage, not on comfort. Partitioned extensively, with strong walls and towers- not an easy prey for attackers!
ID letters at side B (EX: a well is in N8, short broad stairs are in O12)
Back to index
The Young Ladies Tower (YLa) <Templar's Castle, 2nd map>:
ID letters at side B (EX: a secret passage begins in K14, short broad stairs are in J9)
Back to index
The Fortified Medieval Town Map Set (4 maps)
The Fortified Medieval Town (MTw) [??, Mittelalterliche Stadt] <additional map>:
A small town with narrow streets, market place, and a well, built around a castle. The town itself is also strongly protected by walls and towers.
Map-sheet 1: ID letters opposite side C1 (EX: the half-round part of a water basin is in G3, a very dark small tree in P7)
Back to index
The Pilgrims Gate (PGt) <Fortified Medieval Town, 2nd map>:
ID letters at side A2 (EX: a stone stairway is in T13, dark grey stairs in C7)
Back to index
The Lady Gate (LGt) <Fortified Medieval Town, 3rd map>:
ID letters at side A1 (EX: a well is in M14, the middle of the Great Tower in H8)
Back to index
The Montferrat Gate (MGt) <Fortified Medieval Town, 4th map>:
ID letters opposite side C2 (EX: the peephole to the keep dungeon is in P4, short broad stairs are in i4)
Back to index
The Arena (Are) [??, Koppel] <Dark Blades / Dragon Noir 1>:
A large arena pit, and a building with plenty of cells.
ID letters at side 1 (EX: the courtyard gate is in T7, and C11 is the middle of a large green tree)
Back to index
The Watermill (Mil) [??, Wassermühle] <Dark Blades / Dragon Noir 1>:
Trees in blossoms, a stream with stepping-stones and a footbridge, and a water mill.
ID letters at side 5 (EX: a small footbridge is in I11, and the middle of a tree in blossoms is in P15)
Back to index
Dark Blades Campaign Map: Labrynthia (LAB) <Dark Blades>:
A map of Labrynthia for Dark Blades campaign games, in the scale of approx. 20 miles to a 25-mm-hex.
ID letters should be written on the western edge (EX: Cardwyn is in C3, Faith in D11, Saylom in O10)
Back to index
The Caves Map Set (8 maps)
The Dwarves Cave (dwa) [Caverne du Nains, Zwergenhöhle] <Dragon Noir 1>:
Two large stone-walled rooms in a maze of tunnels. (Subterranean map, half-sized)
The mapboard has a printed co-ordinate system (EX: entrances to the room are in G5/H4, H7, F9, F11 and C11)
Back to index
The Dragon's Lake (dra) [Lac du Dragon, See des Drachen] <Dragon Noir 1>:
Two large stone-walled rooms, one of them opening to a lake in form of a porch. (Subterranean map, half-sized)
The mapboard has a printed co-ordinate system (EX: wooden stairs are in A5, D3 and G9)
Back to index
The Dark Island (isl) [L'Ile Souterraine, ??] <Dragon Noir 2>:
A lake with beaches and wooden quays, and in the middle a sandy island with a small, partly rubbled building. (Subterranean map, half-sized)
The mapboard has a printed co-ordinate system (EX: wooden stairs are in A4, a lone tree in F10)
Back to index
The Maze (maz) [Labyrinthe, Labyrinth] <Dragon Noir 2>:
A maze of sunken tunnels and raised flagstone floors, connected by wooden footbridges. (Subterranean map, half-sized)
The mapboard has a printed co-ordinate system (EX: a small platform is in F8, the middle of the big platform in D6)
Back to index
The Wights Bridge (bri) [Pont aux Spectres, Brücke der Gespenster] <Dragon Noir 2>:
A large stone bridge that spans a subterranean stream with mostly steep banks. (Subterranean map, half-sized)
The mapboard has a printed co-ordinate system (EX: bridge hex F10 is rubbled)
Back to index
The Haunted Swamp (swa) [Marais Hanté, Sumpf der Phantome] <Dragon Noir 2>:
A swamp with water patches, and a sandy island in the middle crowned by a round, partly rubbled room. (Subterranean map, half-sized)
The mapboard has a printed co-ordinate system (EX: the entrance to the rubbled room is F6/F7, one of the water puddles in A5)
Back to index
The Jails (jai) [Geoles, ??] <Dragon Noir 2>:
A large torturer's chamber, and plenty of cells around it with grated doors. (Subterranean map, half-sized)
The mapboard has a printed co-ordinate system (EX: the door to the big cell (no. 1) is in D14, the torturer's table in G6)
Back to index
The Pit (pit) [Fosse, Grube] <Dragon Noir 2>:
A large hall with an irregular, sandy pit in the middle that has a mysterious wooden lid in one corner. (Subterranean map, half-sized)
The mapboard has a printed co-ordinate system (EX: a wooden trapdoor is in D4, stairs are in G5, J7, J11, G12 and D10)
Back to index
The Caravanserai (Car) [caravansérail, Karawanserei] <Caravanserai fan extension>:
A walled-in desert building with flat-roofed buildings, stables and an inn. The roofs are accessible through trap doors. The accompanying scenario adds camel counters- warriors, cargo and one VIP camel carrying a litter.
ID letters should be written on side 3; the stairs to the inn are in F5, the well is in I7.
Back to index
The Caravanserai (2013 redesign, Ca2) [caravansérail, Karawanserei] <Caravanserai fan extension>:
Similar to the original Caravanserai map (see above), but with changed terrain aspects, a more regular hex grid and changed lettering (which also changes the coordiates).
ID letters should be written on side 1; the stairs to the inn are in U13, the well is in Q10.
Back to index
The Fort of Mont-Briton (Mbr) [batie de Mont-Briton, Burg Mont-Briton] <Horse raiders fan extension>:
This is one of 4 mapsheets created for the horse raiders extension. It shows a mainly wooden castle, modeled ofter an original castle built in 1312 by the Count of Savoy. To one side it faces a rock cliff, the others are protected by double walls, stockades and gates. A winding road leads up to the gates.
ID letters should be written on side A; a trapdoor is in E5, and stairs in R4.
Back to index
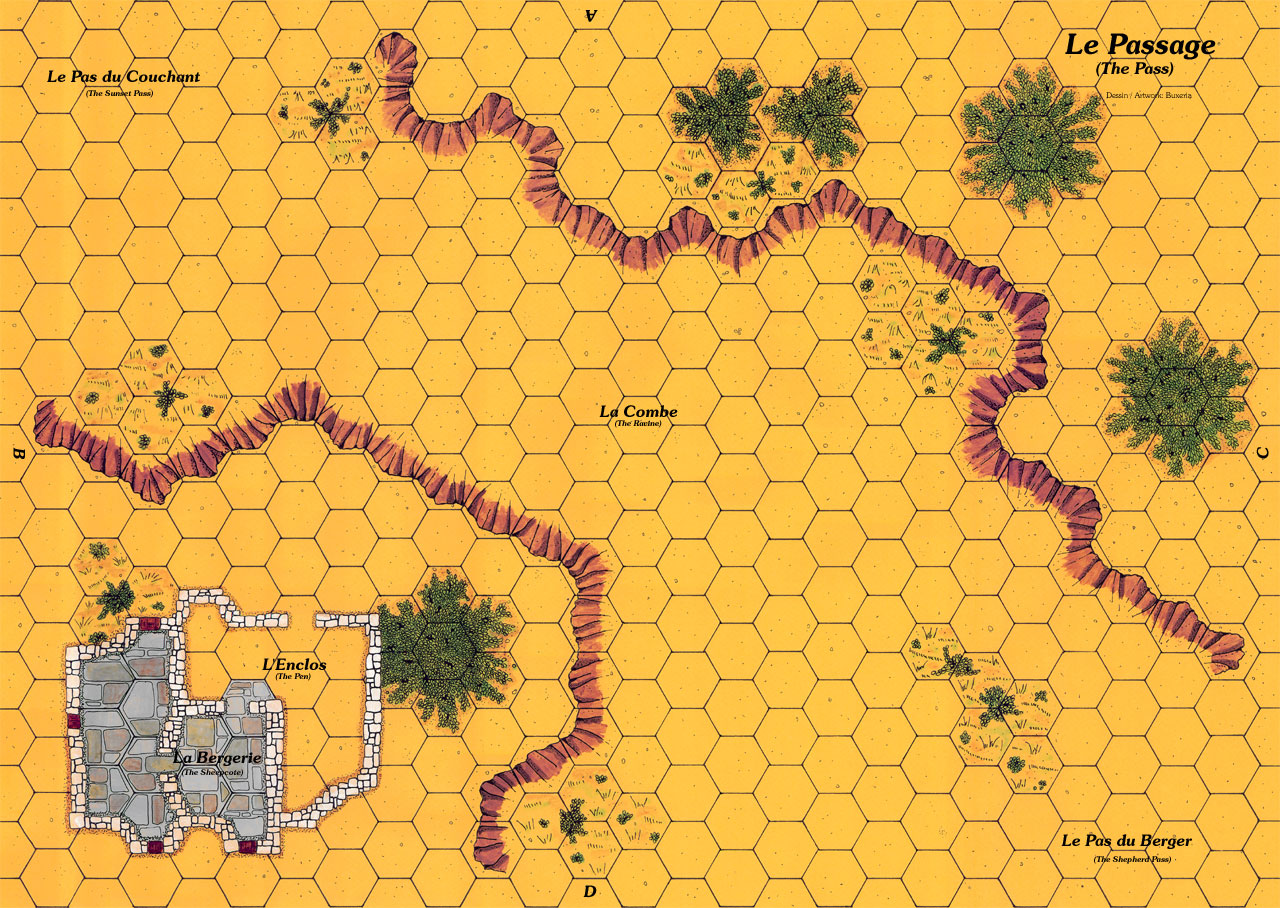
The Pass (Pas) [passage, Pass] <Horse raiders fan extension>:
Not yet in print, preview available. The map shows a passage between two shallow hills, with a sherpherd's cove on one side and trees on the other.
ID letters should be written on side A; a slope ends in H2, a gate in a stone wall is in F12.
Back to index
The Fortified Village Map Set (2 maps)
The Strong House (StH) [maison-forte, festes Haus] <Fortified Village map set, Horse raiders fan extension>:
A guided tour of this map is available. This map shows one half of a village enclosed in stockades. Many small houses with gardens dominate the map; a strong house with a tower and a gate tower are the prominent military features.
ID letters should be written on side B (opposite D); wooden stairs are in B9, and pumpkins in N7.
Back to index
The Lady's Tower (LTw) [tour maitresse, Turm der Herrin] <Fortified Village map set, Horse raiders fan extension>:
A guided tour of this map is available. This map shows the other half of a village enclosed in stockades. Only one house and one gate are on this map, its dominating feature is a huge round stone building with a central keep-like tower. The map also features a pond and vines.
ID letters should be written on side B (opposite D); C3 is the middle of the pond, and vines adjacent to slopes are in P4/Q4/R5.
Back to index
The Welsh Castle Arybrynwrthymor (Ary) [château gallois, walisische Burg] <Welsh castle fan extension>:
This is a small, fictive castle on a rocky site bordering the sea, with a stout gatehouse and belfry, impossible to take when playing by standard rules. To play a regular siege scenario you need to mark some walls as under construction with the overlays provided extra. A steep path leads from a quay to the gate.
Note: Arybrynwrthymor means "castle on the hill by the sea", and as usual with Welsh names it is pronounciated exactly as written.
ID letters should be written on side 2; solitary bushes are in E7 and Q2.
Back to index
The Welsh Castle Arybrynwrthymor (2014 redesign, Ar2) [château gallois, walisische Burg] <Welsh castle fan extension>:
The same as above, a more regular hex grid and changed lettering (which also changes the coordiates).
ID letters should be written on side 1; The word "Barbican" is in I14, the word "Gatehouse" in I10, the center of the Magna Turris (large tower) in T7.
Back to index
The Desert (Des) [désert, Wüste] <Basilieus fan extension>:
Flat ground with a few palm trees and a small (12-hex) hillock, ideal crossbow or knights' charge terrain. The accompanying scenario was originally published in Claymore.
ID letters should be written on side 2; a solitary shrub (or cactus?) is in E7, another one in Q2.
Back to index
The Hill (Hil) [colline, Hügel] <Montjoie fan extension>:
The map shows one slope of a hill (or pass) with a 5-level climb from top to bottom. Ideal for Hastings- or Crecy-type scenarios or to study line-of-sight rules.
ID letters should be written on side 2; a two-hex shrub is in C2/D2, another one in M6.
Back to index
The Sheepfold(She) [La bergerie, Schäferei]:
The map shows a sunken plain between two pieces of higher ground, one with some trees and the other with a pen and hut.
ID letters should be written on side A; the door to the pen is in F12, the words "The Ravine" are in M8.
Back to index
The Woods (Woo) [Le bois, Hain]:
The map shows a glade with many trees; one corner is elevated, with fewer trees.
ID letters should be written on side 1; the words "The Glade" are in L12, the words "The Edge" in W5.
Back to index
The Islet (Ilt) [L'ilot, Inselchen]:
The map is mainly open sea (blue), with a small isle in one quarter. The isle has a hill, one rocky coast and one beach coast.
ID letters should be written on side 1; offshore rocks are in I10/J11/J12, and D12/D13 are beach-only hexes.
Back to index
The Cove (Cov) [crique, Felsenbucht]:
The map shows a stretch of bluff, a coast with a bit of beach but also steep and rocky parts; St. Robert's Tower guards a small fishermen's village on the bigger of two capes.
ID letters should be written on side 1; the middle of Robert's Tower is at E5, the letter "C" of one fisherman's house in K11.
Back to index
The Beach (Bea) [plage, Strand]:
The map shows a lonely stretch of sandy coast with one rocky cape.
ID letters should be written on side 1; the middle of a big tree is in C13, the point of the cape in V2.
Back to index
The River (Riv) [riviere, Fluss]:
The map shows a river with two fords and some stony rapids.
ID letters should be written on side 1; the middle of the biggest tree is in V7, the words "The Ford" in M8.
Back to index
The Hamlet (Ham) [hameau, Weiler]:
The map shows a market place, a bit bigger than the village, and richer, with an orchard, a pond, a market, a chapel, and several other buildings; it even has a high street!
ID letters should be written on side 1; the chapel entrance is in S8, the words "High Street" are in J8.
Back to index
The Wharf half-map (Whq) [quai, Kai]:
The map shows a beach with a wooden pier or quay along one long edge. A warehouse is near the quay.
ID letters should be written on side 1; the entrance to the warehouse is in D8.
Back to index
The Bell Tower half-map (Bel) [tour de la campane, Glockenturm]:
The map shows a beach with a cliff edge that is rocky in some parts; above the rocks, a square bell tower rises.
ID letters should be written on side 1; the centre of the tower is in C10.
Back to index
The Crusader Trail (Cru) [chemin des Croisés, Kreuzfahrerpfad]:
The map shows a piece of open ground with a small hill, a little swamp and a few trees. A path winds its way through the map.
ID letters should be written on side 1; the centre of the big tree is in D3, and the centre of the swamp (with most of the word "swamp") in O4.
Back to index
The Knoll (Kno) [tertre, Kuppe]:
The map shows a large hill of elevation 3 (or 4, if you count the outlying slopes) and two small mounds. Good terrain for an outlook, or for a last stand!
ID letters should be written on side 1; the three hexes on the highest level are in N8, O8 and P9.
Back to index
The Meadow (Mea) [prairie, Wiese]:
The map shows just a lot of open ground, two trees, and a few shrubs. Pasture land.
ID letters should be written on side 1; the centre of the big tree is in D11.
Back to index
Guiscard Overlay Pages: Byzantine chapel, Lombard farm, plain, tents, trees, shrub <Guiscard>:
Two sheets that come with the Guiscard game to modify the landscape: a 6x8 Byzantine chapel or small church, a 6x8 Lombard farm with a stone walls and a wooden barn, an 8x9 plain with trees to cover the castle on the Eagle Nest map, 8 4-hex tents to build a camp, two big trees (one of them an olive tree), 2 small trees, 3 patches of shrubbery.
Back to index
Diex Aïe Overlay Pages: Saxon Great Hall, Saxon house, trees, shrub <Diex Aïe>:
Two sheets that come with the Diex Aïe game to modify the landscape: a 5x7 Saxon hall, a 3x5 Saxon wattle-and-daub house, 1 big tree, 1 small tree, 1 patch of shrubbery, some markers on one page ("The Saxon Great Hall"), and 4 Saxon houses, 3 trees and 3 patches of shrubbery on the other ("The Saxon Houses").
Back to index
The Anarchy Overlay Pages: Belfry, Battering Ram, Mining Gallery, Scaffolding, Hoardings <The Anarchy>:
Three sheets that come with the Anarchy game, containing huge siege engines and wooden constructions like scaffolding and hoardings to modify the castle and other big buildings: (2 rams & 2 mining galleries, belfry, hoardings & scaffolding). These overlays partly replace the older "Walls, Scaffolding, Belfry" overlays, they also replace the funny little siege engines that came with the original "Siege" game.
Back to index
Overlay Page: Walls, Scaffolding, Belfry [ensemble murs, échafaudages et
tour de siège; Mauern, Gerüste und Belagerungsturm] <Welsh castle and siege tower fan extensions>:
This sheet contains wall and tower sections, scaffoldings, a crane and a 4-level siege tower with a drawbridge. They can be used as overlays to modify maps or to represent castle sections under construction (rules provided in the Welsh castle extension, where you can also get accompanying markers). The siege tower is a monster that replaces the puny littly tower from the Siege game (rules: see here).
Back to index
Overlay Page: Ships [nefs, Schiffe] <Nefs and Galleys fan extension>:
On this sheet you get 5 ships (complete with sails and some "lower deck" markers) to go with naval scenarios or with the harbour maps. In ascending order of size these are a 6-hex cog, an 8-hex felluca, a 13-hex, 2-masted cargo ship (nef), a 14-hex galley and a 14-hex, 1-masted horse carrier.
Back to index
Overlay Page: Cross, Hillocks, Houses [croix, tertre, maisons, Kreuz, Hügel, Häuser]:
On this sheet you get a hillock with a cross, a cross, 4 plain ground overlays and 2 small houses.
Back to index
Overlay Page: Trees and Woodpiles [Arbres et abattis, Bäume und Holzstapel]:
On this sheet you get 6 small trees (3 hexes), 4 large trees (7 hexes) and 10 2-hex-woodpiles.
Back to index
Overlay Page: Hoardings [Les Hourds, Hurden (Wehrgänge)]:
On this sheet you get a lot of temporary hoardings to attach to walls, towers and castle buildings.
Back to index
The Orléans Map Set (2 maps)
Les Tourelles Gatehouse (Tou) [Les Tourelles, Torhaus Les Tourelles] <Orléans 1429 map set, Orleans 1429 fan extension>:
The map shows the fortified gate on the southern side of the Loire bridge and some town buildings like the Augustine convent and an orchard; some of the building walls are in rubble- the Orléans 1429 scenario (based on the siege of Orléans during the 100-years war) comes with early types of cannon!
ID letters should be written on side 2 (which is the western map edge); a wall turned into rubble is in C1, a 1-hex bush in L14.
Back to index
The Saint Antoine Fortification (Ant) [La Bastille Saint Antoine, Festung St. Antoine] <Orléans 1429 map set, Orleans fan extension>:
This is the companion map to La Tourelles and shows the stone bridge across the Loire with its wooden and stone fortifications. It runs from North (side 4) to South (side 2) across the Ile St. Antoine.
ID letters should be written on side 3 (which is the western map edge); wooden stairs are in G4, a 1-hex bush in O10.
Back to index
The Fortified Saxon/Medieval Harbour Map Set (4 maps)
This map set can be used as-is, but it can also be combined with other maps: the coast fits the (Eurogames edition) Vikings maps (abbey, watchtower, cape 1, cape 2), and the inland features connect to the medieval town maps in several ways.
The Wharves (Wha) [entrepots, Werft] <Fortified Saxon/Medieval Harbour map set, Fortified Harbour fan extension>:
This map shows a quay and the fortified western jetty, the harbour entrance and the tower of the eastern jetty and small buildings inland.
ID letters should be written on side A1; wooden stairs are in A2, the center of Morcar's tower in O3.
Back to index
The Quay (Qua) [jetée, Mole] <Fortified Saxon/Medieval Harbour map set, Fortified Harbour fan extension>:
I named that map, it has no name printed. It shows the east jetty protecting the harbour, a stone quayside and a few small inland buildings.
ID letters should be written on side A2; wooden stairs leading to the entrance tower are in D7, the centre of another tower in W3.
Back to index
The King's Gate (KGt) [porte du roi, Königstor] <Fortified Saxon/Medieval Harbour map set, Fortified Harbour fan extension>:
The map shows the massive King's Gate, flanked by stone towers, the city wall, and some houses.
ID letters should be written on side opposite to C1; the centre of the Lion's Tower is in E12, the apsis of St.George's Chapel in W10.
Back to index
The Merchants' Gate (MeG) [porte des marchands, Kaufmannstor] <Fortified Saxon/Medieval Harbour map set, Fortified Harbour fan extension>:
This part of the town has town hosues, animal pens and two gates, but the dominating feature is the massive keep with stairs that lead to 7 levels above the ground.
ID letters should be written on side opposite to C1; a lonely tree is in G8, a water trough in a pen is in P8.
Back to index
The Fortified Crusader Harbour Map Set (2 maps + 2 half-maps)
This map is confusing insofar as it bears the printed name of "fortified medieval harbour". This comes from the overlap between reconstructing the original and partly destroyed plans of the "Fortified Harbour" planned by Eurogames and the effort to design a new harbour map. The original "Eurogames harbour" is now designated "Saxon harbour", while this one became the "Crusader harbour".
Again, the inland features of this harbour connect to the medieval town maps. The harbour is meant to be played together with the ships extension.
The Old Sea Tower (STw) [vieille tour de mer, alter Seeturm] <Fortified Crusader Harbour map set, Fortified Crusader Harbour fan extension>:
Most of this map is the harbour entrance, guarded by a jetty and a tower and one big square tower in the middle of the entrance. This tower can only be reached by boat via a small pier and stairs.
ID letters should be written on side opposite to E1; the centre of St. Michael's tower is in H7, the stairs to the old sea tower are in T13.
Back to index
The Levant Tower (LeT) [tour du Levant, Levantinerturm] <Fortified Crusader Harbour map set, Fortified Crusader Harbour fan extension>:
The map shows a fortified jetty with two towers, one round and one square.
ID letters should be written on side opposite to E2; the centre of Lusignan's tower is in L14, wooden stairs are in T5.
Back to index
The Fishermen's Wharfs half-map (Fis) [pontons de pêcheurs, Fischerkai] <Fortified Crusader Harbour map set, Fortified Crusader Harbour fan extension>:
This map is a bit special insofar as it is designed to overlap the medieval town maps to form a waterfront outside the main city wall. An additional gate (Caesarea gate) leads to the harbour area without entering the town.
ID letters should be written on the landward side; the Caesarea gate is in H6, wooden stairs to the pier are in N8.
Back to index
The Naves Quays half-map (NaQ) [quais des nefs, Lastschiffkai] <Fortified Crusader Harbour map set, Fortified Crusader Harbour fan extension>:
This map is a bit special insofar as it is designed to overlap the medieval town maps to form a waterfront outside the main city wall. Beside the city and harbour walls it shows a quayside for bigger ships with a loading crane.
ID letters should be written on the landward side; big wooden stairs are in L4, the crane winch is in S5.
Back to index
The Swamp (Swm) [marécage, Sumpf] <fan-created map>:
Not yet in print, preview available. The map shows a stretch of swamp with a path through it. Water puddles and a few trees are the main other features.
ID letters should be written on side 3; a very small hill with a tree is in G7, one without a tree is in S4.
Back to index
As the author of this page I take no expressed or implied responsibility for the content of external links; opinions expressed on such pages are not necessarily mine. The web space provider is not responsible for the contents of this page or any linked pages.


Written and published by Lutz Pietschker. Please send comments about technical problems to the site master.
-Made with a Mac!-
, last change
2011-03-12