VASSAL Module: Advanced Civilization
This help file describes how to play with the Advanced Civilization VASSAL module.
Content
Further Reading
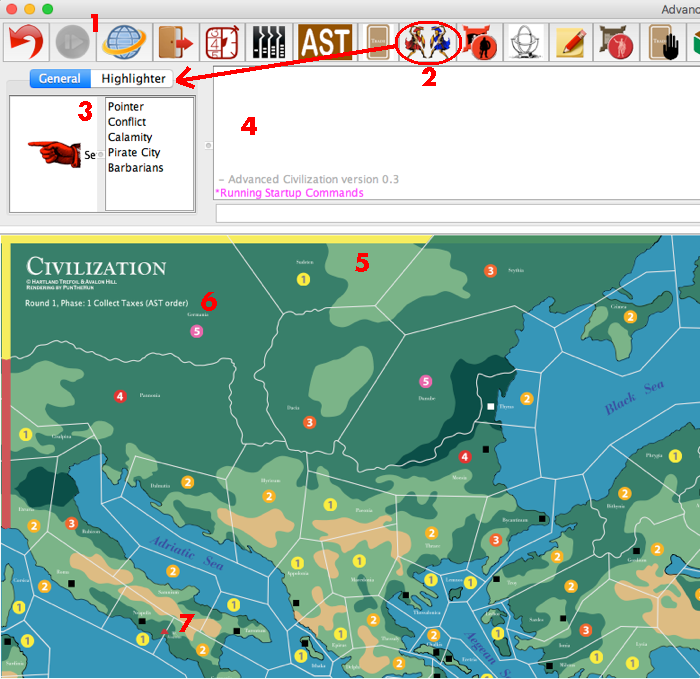
The Main Window
This section describes the main window. For a detailed description of the toolbar see the next section.
- Main Toolbar: See below
- Toolbar button: This one opens the …
- The Markers piece palette: While all other windows and palettes are free-floating, this palettewill dock to the left of the
- Chat Log, which is above the …
- Main Map.
- The game phase indicator is repeated at the top left and bottom right of the main map.
- Volcanos are shown as little red volcano images on the map.
Game Controls
The Main Toolbar
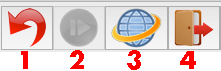
- Undo: This button reverses your last action(s).
- Step: This button is only active while you step through a log file (see Play by E-Mail). It tells VASSAL to display the next step in the log.
- Server: This button displays the VASSAL server window. You need it for online play.
- Retire: This button allows you to retire from play and (optionally) to connect again as a different side.
These functions are not specific to the Advanced Civilization module. For details on these functions please see the VASSAL User's Guide.

- Phase Indicator: Opens a small window that allows you to advance the phase indicator ("+" button) to keep track of where you are in the game. This advance will be shown in the log. You can step back with the "-" button if you made a mistake. When advancing from the last phase you will step to the first phase of the next round.
Note that the current phase and round information is also displayed in the top left and bottom right part of the main map.
- Sequence of Play: Displays the sequence of play (i. e. phases of a game round) and information about the calamities.
- AST: Opens the AST window.
- Trade Cards: Opens a window with the trade card stacks. This window also has an green area called "trade board" which you will use to exchange cards with other players in the trade phase. NB: Cards put onto the trade board will always appear face-down.
- Markers: Opens a "palette" from which you can draw markers (you can see it on the main map)
- General tab: several helpful markers that are not part of the original boardgame
- A pointing hand to temporarily mak places or situations. Initially the marker shows your player side. Right-click the placed marker to change the text, type "r" to rotate the selected pointer.
- Conflict: Used to mark regions in which conflict occurs. You can also place this marker by right-clicking a city, ship or population token and choosing "Place Marker" (keyboard: CTRL X).
- Calamity: Used to mark calamity sites
- Pirate City and Barbarians: An alternative method to place these tokens on the map (see "Barbarians & Pirates" below for the standard method)
- Highlighter tab:
- A transparent-yellow bar to be used to highlight rows and columns in the civilization advances calculator sheet (as printed on the backside of the rulebook)
- Barbarians & Pirates: Opens a window from which you can draw complete stacks of 15 barbarians (each stack always shows how many tokens are in it, as the barbarians always move in groups) to resolve the "Barbarian Hordes" calamity (rule 30.52). In this window you also find pirate cities to mark the results of the "Piracy" calamity (rule 30.91).
- Civilization Advances: Opens a tabbed panel from which you can draw tokens for civilization advances to place them on your player mat.
- Advances that belong to 2 groups (colours) are available from both group tabs.
- Use the arrow-right key to show or hide the details about the advance.
- Normally the player mats will automatically add the civilization points on your player mat.
- Notes: Opens a notes window, used to… take notes. The tabs show which notes are
- public (everyone can see them) or
- private (your eyes only).
- Scenario notes are meant to be used to keep general information about the game.
- Delayed notes are a safeguard: You can enter a note which is then kept safe and cannot be changed. Later you can reveal the note. May be useful for trading (or bidding, but normally there is no bidding in this game).
- Player Mats: Shows a list of all player mats. Every player can see all player mats, but only the owner can move tokens to or from the map. See the next section for details.
- Player Hands and Civilization Advances Overview: Each player has 2 additional private windows that are only visible to himself. You can open these windows from the player mat or from this toolsbar button.

These buttons lead, more or less, to administrative actions:
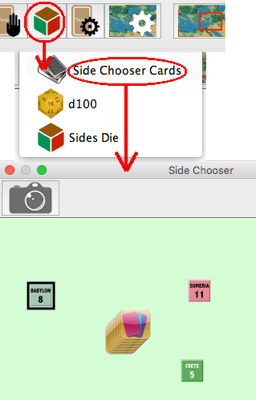
- Side Chooser and dice
May be used to determine sides before the game and to resolve random decisions during the game.
- The Side Chooser Cards let you draw chits which you can use as numbers or directly as sides. This deck replaces the numbered cards of the original game.
- The d100 is a 100-sided die for general random decisions.
- The Side Chooser Die lets you roll for sides. It is not as effective as the cards as you may need a number of re-rolls to get a valid result.
- Trade Card Administration
Used by the Setup and Master users to prepare the trade card decks before play and to re-stack them after the "resolve calamities" and "buy civilization advances" phases.
- Setup Panel: Used by the Setup or Masters user to perform several pre-game setups. See the Setup section for details.

These buttons work directly and exclusively on the main map. You will find similar buttons on other windows.
- Overview Map (main map only): creates an overview window that allows you to navigate the map more easily.
- Take Screenshot Image: Create a screenshot image in PNG format. You will be promped for the file name and destination.
- Take Text Screenshot: Create a textual representation of the map situation in raw text format (usual file types would be .txt or .log). You will be promped for the file name and destination.
- Zoom In: Enlarge the map view in pre-defined steps.
- Zoom Level: Select one of the pre-defined zoom levels for the map.
- Zoom Out: Reduce the map view in pre-defined steps.
- Hide Counters: Hides all counters on the map. Used to see the map more clearly. This is probably neither necessary nor very useful in this module as it also removes other information from the map.
- Remove "Moved" Markers: This button removes the movement markers and all movement trails from the map.
Note: In many windows, the tokens you send to the map or move inside the map will be marked as "moved" with a blue flag; sometimes they also leave a "movement trail" to better show from where they came from and where they went. This is useful to keep track of which tokens you already moved during your turn and to see which still may move. Of course, all movement will also be logged in the chat section of the window.
The Trade Cards Window
From this window you draw the trade cards according to the number of cities you have. It also has an area to exchange cards during the trading phase.
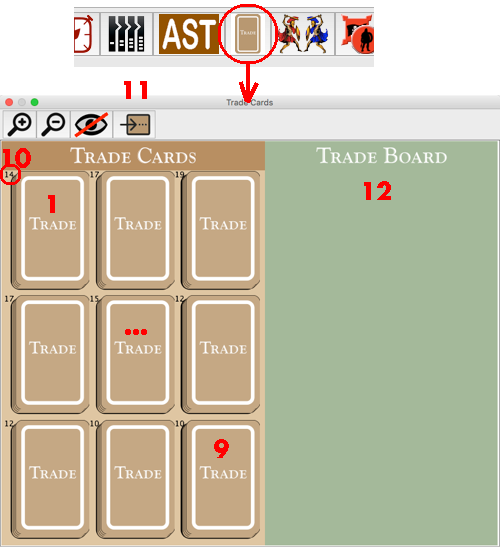
Open the window with the toolbar button. Draw cards from the decks 1 to 9 directly to your player hand. New cards are automatically face-up, so take care not to drop them anywhere but to your own player hand. You can flip cards at any time by right-clicking them and choosing "Flip", or by selecting them and typing CTRL F. Each deck shows how many cards are left in the deck (10).
The Trade Board section is used to exchange Trade cards between players. All cards put here are automatically flipped face-down.
You can also use this area to show cards you use to pay civilization advances. Flip them face-up and after the buy discard them (right click, "Discard", or type ALT CTRL R).
The button (11) sends all cards to a temporary holding area to re-build the decks after the calamity resolution phase. This button can only be used by the Setup and Master sides.
The AST Window
The Archeologial Succession table will be prepared before the game starts. It should only show the tracks for those nations that are actually in the game.
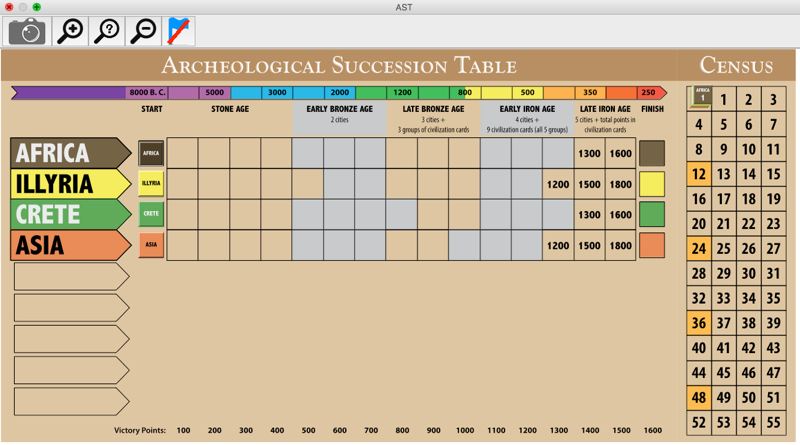
Each player can only move his own AST and Census markers. If the Census markers are stacked, you can access markers in the stack by double-clicking the stack and then moving a single marker.
Player Mats and Hands
Each side has 3 private windows: A player mat to store cities, ships, population and treasury plus civilization advances, a player hand to hold your trade cards and the civilzation advances calculator. All players can see your player mat (but cannot move your tokens); the other windows are invisible to them.
Player Mat
To open your player mat, use the dropdown menu (13) in the main toolbar and select the mat you want to see.
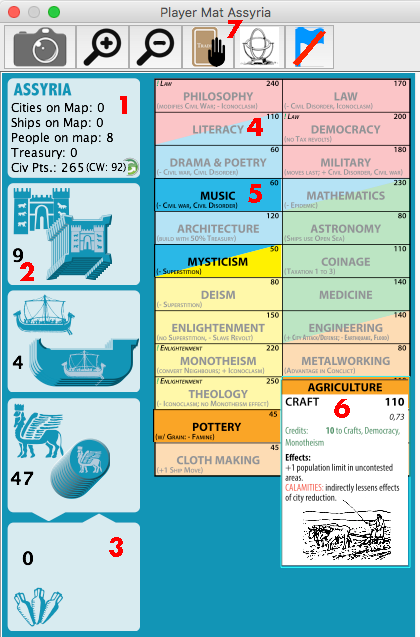
- Counters showing where your tokens are. These counters assume that you only put your tokens where they belong. If you place a city on your player hand, for example, it will be shown as "on the map" because it is not on the player mat.
- The "Civ Pts" counter totals the civilization points on your mat (see 4. to 6.). Normally this works well, but you can trick it; if you want to make sure the numbers are correct, click the small green re-calculation button.
- The "CW" value is the "Civil War value" that is used to determine the side that benefits from Civil war (rule 30.411, the highest value benefits).
- Here is your supply of city, ship and population tokens.
- Put population tokens here when they go to the treasury. They should flip to the "treasury" side automatically. You can flip them manually with the CTRL F command.
- Place the civilzations advances here. The spaces tell you rougly what they do and which requisites they have.
- This is a civilization advance you already bought.
- You can flip the advances tokens to show details by using the right-arrow key, or through the right-click menu of the token.
- With these two buttons you can open your player hand and your civilization advances calculator.
Player Hand
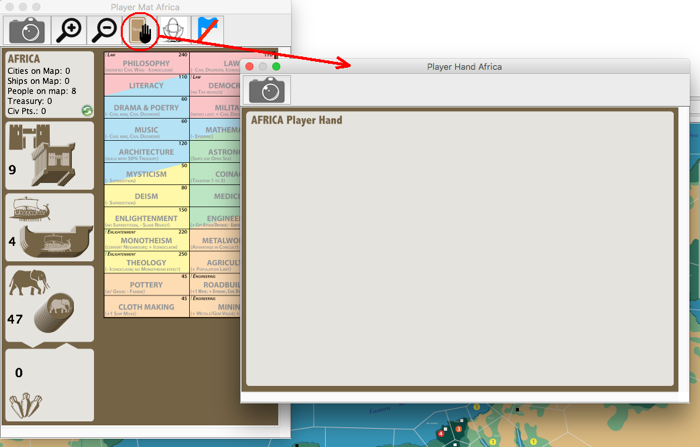
A very simple storage place for trade cards and other things the other players should not see (according to the rules, the hand of trade cards is the only concealed information in the game).
Player Civilization Advances Calculator
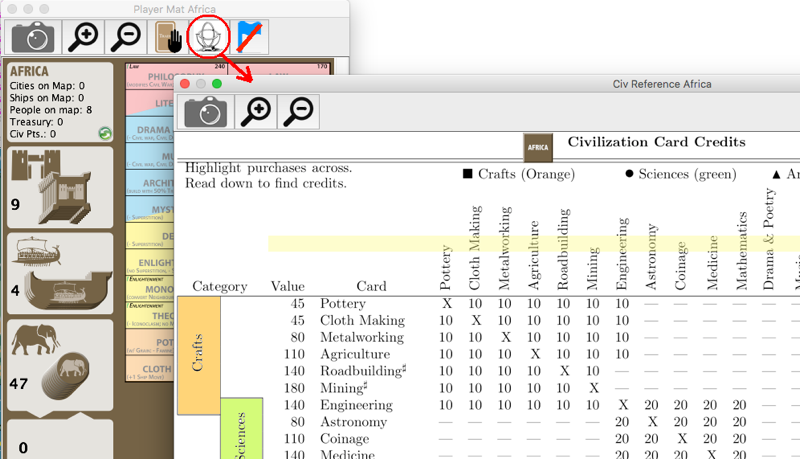
This is a reproduction of the back side of the rulebook. You can move the yellow highlighter to mark advances you already have. To get more Highlighters, right-click and clone a marker or draw additional ones from the "Highlighters" tab of the Marker panel (9). You can also rotate the markers to mark a vertical line.
However, much more elegant calculators based on Excel or Numbers are available at boardgamegeek.com (Excel) or on my site (Numbers). If you use Numbers on MacOS or iOS, I recommend to use my calculator as it implements the complete options including the trade variant and also has a what-if calculation option.
Game Procedures
 Choose player sides
This is done only once, before the actual game starts. Open the Side Chooser and draw chits from the stack. The numbers tell you in which order you choose sides. Alternatively you can just take the nation you have drawn (re-draw if you have drawn a nation that is not in the game).
Trading
Trading should be restricted to a simplified system as it was implemented in the Advanced Civilization computer game (DOS):
- Each trade involves exactly 3 cards.
- Players who want to trade offer 2 cards truthfully. The do not say anything about the third card. In any case they must make clear which of the cards on offer are the 2 guaranteed ones.
- Takers will get the 2 cards offered plus any third card the trader adds to the trade.
- Trade ends after 3 rounds of offers or after a specified time.
Offline Play (PBEM = Play by E-Mail)
The way to play by e-mail is completely described in the VASSAL User's Guide. The main steps are:
- One player prepares the module (trade card, AST etc., see Setup Guide), possibly with a short introductory session in which players choose their sides. He or she will send a file with the extension .vsav to all other players. When starting the module, choose "Load saved game" and choose this .vsav file. This is you common starting point.
- On his turn, each player will
- step through any log files he may have received, then
- log his own actions in a logfile and
- send it to the other players.
An exchange of logfiles will be necessary for the following phases:
- City revolts (AST order); simultaneous tax collection if no revolts happen.
- Population expansion & census update (AST order)
- Ship maintenance/construction (census order)
- Movement (census order)
- Conflict is usually automatic and thus simultaneous; players can demand to have it done in AST order.
- City construction can usually be done simultaneously and can be combined with removing surplus population & checking city support. If lack of support forces reduction of a city this is resolved in AST order.
- Drawing trade cards and purchase of gold/ivory: fewest city goes first (resolve ties by AST order).
Note: Drawing cards and trading could be done in a live session.
- Trade: see simplified procedure, above.
- Resolve calamities: in ascending level order (2 to 9), non-tradable before tradable in each level.
- Monotheism conversion happens in AST order after all calamities have been resolved. After that, city support must be checked again and resolved, if necessary.
- Civilization advances are bought in AST order. AST markers are immediately adjusted as necessary.
Online Play (VASSAL Server)
The way to play via the server is completely described in the VASSAL User's Guide.
Note: As the VASSAL server choose the "VASSAL Legacy" server as it seems to be the only one that works consistently.
VASSAL is an open source project. Advanced Civilization is a boardgame by The Avalon Hill Game Company (1991). The Advanced Civilization module was created by Lutz Pietschker (PunTheHun at boardgamegeek.com).