
Author:
Lutz Pietschker
Version: ca. 2003
eAmbush Manual Main Page | eAmbush Project Page | License Agreement
eAmbush has 2 different user interfaces:
In the interface for large computer screens, all functions of eAmbush! are accessible from 4 screens:
All screens will be described in detail below.
There are also maintenance screens in the auxiliary data files. They are not meant for the user, but only for administrative purposes, and depending on the version of eAmbush! they may not be visible at all.
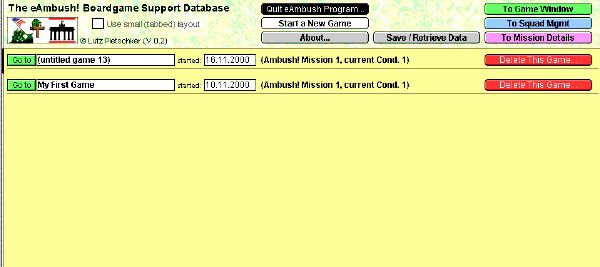
When you start the eAmbush Program, you first enter the "About" screen, showing reference information and some "legalese". Click "Continue" to go to the List Window. This window is mainly meant to give an overview of the games currently running or stored. "Game" is the term I use for the play of one scenario. A campaign consists of several games; eAmbush does not provide special campaign functions; you can, however, take your squad with you when starting a new game. You may want to name the games of an ongoing campaign in a way that shows their connection.
On your first start, you will only see one game in the list: The mission 1 of the original Ambush! game module, with a pre-defined squad as printed in the rules book.
The games are shown in reverse order of creation (i.e. latest first). You can change the start date by clicking into the date field and entering a new date in the format "dd.mm.yyyy". Clicking on the "Go To" button to the left of the name of a game will bring you to the game window for that game.
Each row will shown the name you gave to that game, the date you started it, the mission you play, and the current condition. From this layout, you can only edit the name and date.
Note that many changes that are dependent on your input will only show up after you leave the input field. You do this by clicking outside the field, or by pressing the TAB key (the latter will also bring you to the next input field).
This is a general rule for FileMaker databases; it is similar to the behavior of other database or spreadsheet programs.
You can delete a game by hitting the "Delete This Game..." button; this will delete the selected game, together with the squad defined in it. It will not affect other games or the squads defined in them; after a squad has been copied, it is completely independent of its source squad. The effects of "Delete Game" cannot be un-done. Since a game does not occupy a lot of storage space, you may decide to keep your games for a long time.
Navigate to the other layouts by clicking the buttons to the right. End the program by clicking the "Quit" button. The "About..." button shows the reference screen you already encountered at program start. The "Save/Retrieve Data" lets you copy your data to a save file, or retrieve data from a save file. The use of this button is described in the manual section on update/re-install.
"New Game" starts, you guessed it, a...
Start a new game (scenario play) by clicking the "New Game" button on the List screen; this is the only place to start a new game. You will be asked whether you want to take your entire squad with you, or only the active soldiers (Ok or wounded), or none. Note that this refers to the soldiers of the current game; the "current" game is the one showing a narrow black bar to the left of its name on the list screen.
When you start a new game, you go to the Mission screen automatically:
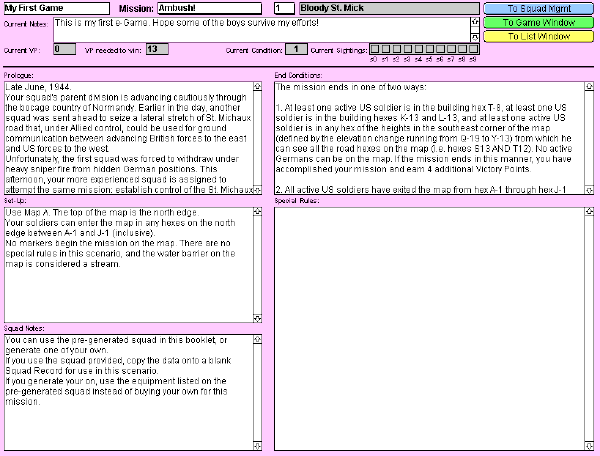
In this window, you can select a module and mission to play, and see the details fo that mission. This view can be used as a reference at any time, for example to check back on victory conditions or special rules.
Enter a name for your game in the text field in the upper left corner of the screen. Choose a module (like "Ambush!", "Move Out!" etc.) from the drop-down list next to the "Mission:" label, and the mission number from the small drop-down list next to it. The mission name will show up automatically to the right of the number.
Enter any notes you may want to take about the game in the "Notes" field; notes can also be entered from the main Game screen or from the Squad Management screen.
The "Current Condition" field will be set to 1 automatically when you start a new game and you cannot change it from this screen, "VP" will be set to "0", and the VP necessary to win are filled in automatically. At game start, no sightings have been made, so the ten "Sighting" checkboxes are initially empty.
Below that, read about mission objective, set-up, squad generation, special rules etc. in the large text boxes. This is the text as printed in the scenario descriptions of the module. You can scroll through the text (click inside the text box to see the scroll bar), but not change it.
Use the buttons on the right-hand side of the screen to navigate to the other screens when you are done. If this is a new game, you may want to go to the Squad Management screen next, else go to the main Game screen.
This is the screen you will use most of the time to keep track of your squad's status, enemies, and to do paragraph look-ups.
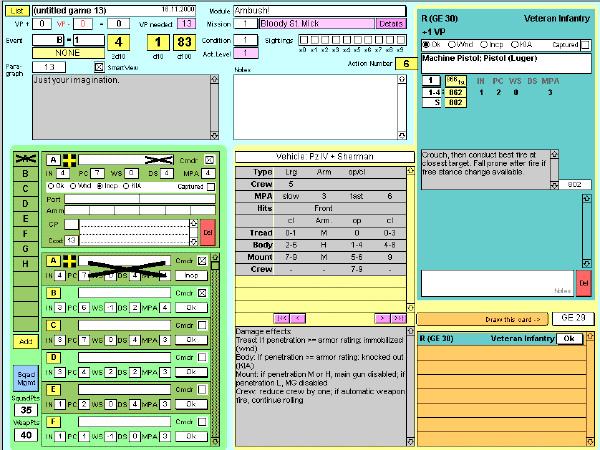
To the upper left, you see the name of the game you play, and the starting date as an insert (you cannot change the date from here). Go to the list of games by clicking the "List" button.
Below are fields to enter Victory Points won or lost; he total is calculated automatically. You also see the number of VP needed to win the scenario. To the right of that is mission information; you can choose game module, mission number and condition from here. Click the "Sightings" check boxes as sightings occur. In the "Notes" field below you can enter any notes you may want to keep. To see additional mission details, click the "Details" button.
Below the game name you have the event/paragraph management and the dice. Enter the hex designation by choosing the values from the drop-down lists. The corresponding paragraph reference will show up in the field below. Click the paragraph number to transfer it to the white "Paragraph" box below, and the corresponding paragraph will show automatically. You can also enter a paragraph number by typing it into the "Paragraph" box.
The "Smart View" checkbox modifies the paragraph lookup slightly: If checked, paragraph references preceded by a sighting number will
not
show if the corresponding sighting has already been checked off.
The dice are standard Ambush" dice; click to roll. "d20" rolls two 10-sided dice and adds the results (giving a value range of 0 to 18), "d10" rolls one 10-sided die, and "d100" rolls percentage dice (as needed for the fire result table). The "d20" has an additional special feature: If the hex reference letter is "RE" (indicating a lookup in the Random Event column), the number rolled is automatically entered as the RE lookup reference number.
The rest of the screen is split into 3 areas: Management of your own squad, a table reference, and management of soldier cards drawn during the game.
In this area you have a list of all your soldiers; one of them will show in detail above the list. Click either the soldier's letter in the list, or in the column of letters to the left of it, to bring this soldier's data to the detail screen.
In the list you can only see the soldier's name, his IN, PC, WS, DS and MPA values, and whether he is a commander or not; you cannot change these values. You can see and change the status; choose a value from the drop-down list. Note that for states other than "Ok" you will see a status icon. If the soldier is inactive, a strike-out cross will also show.
In the detail area you can see and change all the values shown in the list, plus his port and ammo boxes, cost, combat points and notes. A "Delete" button lets you delete this soldier (after a warning notice).
To the left of the list you can see the squad and weapon points. The "Add" button lets you add a single soldier to your squad (this may be useful if you draw a reinforcement card). Note that the soldier identification letters should be unique for each game; however, in principle you are not restricted to single letters (though the layouts assume that it will be a single letter, so a multi-letter designation may look funny).
The "Squad Mgmt" button brings you to the Squad Management screen for detailed squad management.
To look at a certain table, choose it from the drop-down list above the gray table space. The table data will show up. Scroll vertically with the scroll bar, and horizontally with the buttons (going one column or 4 columns to the left or right). The row designation in bold print will always show, though it may not always be valid for all columns. General information will show in the text box below the table, if available.
The list at the bottom of this area shows all cards you have drawn so far. Draw a card by choosing from the drop-down list above the card list and click the "Draw This Card" button. The card will be added to the list, and it will also immediately show in the detail window above.
The list only shows the soldier's number, letter, unit type and status; the status is the only item you can change here. An icon will indicate non-Ok states, a strike-out cross marks inactive soldiers. The background colour shows whether the soldier is friend (green) or enemy (blue for Germans, orange for Japanese). Click the list row to bring that soldier's data to the detail area.
In the detail area you see more information about the soldier, similarly to what is printed on the cards. Let's begin with a look at the bottom of the card: You can add notes to the card in the "Notes" field at the bottom or delete the card by clicking the "Del" button next to it. A deleted card can be re-drawn at any time, but current notes and status changes are lost.
At the top of the detail area, letter/number, unit and VP information are shown. Below that is a field to mark status changes. The "Weapons" field initially shows the information printed on the card, but you can edit this field to indicate changes (like jams, out-of-ammo status etc.).
Below the "Weapons" field you see the paragraph information as shown on the card. Note the Condition or Special Reaction by choosing a value from the drop-down list (this is only to remember it, it has no other function). The yellow "1st" field next to it shows the paragraph number this soldier uses on the first turn; click it to show this paragraph in the paragraph box below.
Below that, you see the paragraphs this soldier uses under certain Conditions or Special Reactions (or Crew Status, for vehicles). Note that only one column is shown; this is the column corresponding to the current value of the Action Number. The Action Number is shown to the left of the card detail area; click it to roll a new Action Number. Click the paragraph number to look up this paragraph.
To the right of the paragraph references you see the IN, PC, WS, DS and MPA values for this soldier. For vehicles, these values change with the crew status, so you will see one set of values in each row.
This screen is dedicated to the detailed management of your own squad. You see the name of your game and the starting date as an insert (you cannot edit the date from here) as well as the module and mission and the game notes. Navigate to the other screens by clicking the appropriate buttons.
Below the mission information, the "squad set-up" section from the Mission screen is shown for reference.
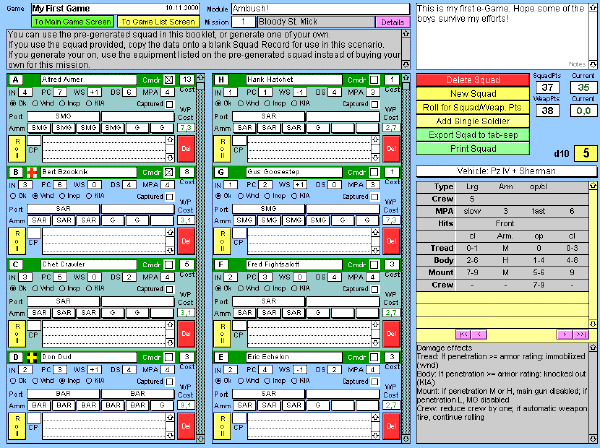
The main part of this screen is given to the squad lists; 8 of your soldiers are visible here at any time, sorted from A to H in the left list and inversely in the right list. After every input these lists will scroll back to the top, so this should guarantee that you always see all your soldiers. To the right of the lists, you see an array of buttons to perform special functions, squad points/weapon points information, a 10-sided die, and a table lookup.
To roll the die, click it. A random number from 0 to 9 will be generated. (You may re-roll as often as you like, but DON'T CHEAT!)
To look at a certain table, choose it from the drop-down list above the gray table space. The table data will shown up. Scroll vertically with the scroll bar, and horizontally with the buttons (going one column or 4 columns to the left or right). The row designation in bold print will always show, though it may not always be valid for all columns. General information will show in the text box below the table, if available.
Note that this table is independent of the one on the "Game" screen.
Now for some details of squad management.
You can enter the points available in the appropriate fields. To do this, you may want to roll the die and look up the Squad Points Table. You may also let the program perform this task by clicking the "Roll for Squad/Weapon Pts" button. Note that this overwrites previous values without recall. The "New Squad"/"Random Squad" option also re-rolls the squad and weapon points.
The "Current Points" fields help you keep track of the points currently spent. While squad points are added up automatically, spent weapon points are only re-calculated when you click the field. Note that only weapon points for standard weapons will be added up (see also below).
If you need to delete the entire squad, click the fiery red "Delete" button. After a warning notice, this removes all soldiers . You cannot un-do this.
To generate a new squad, you must delete your existing squad first. The "New Squad" button then lets you choose one of three options:
The last option rolls for squad and weapon points and distributes the squad points among commanders and soldiers according to an arcane algorithm. It will assign roughly half of the points available to commanders and he rest to the men. It will then roll for PC, WS, and DS. It will not assign any weapons.
The "Add Single Soldier" button adds just one soldier to your squad (even if empty). It will not fill in any values automatically. Note that the soldier identification letters should be unique for each game; however, in principle you are not restricted to single letters (though the layouts assume that it will be a single letter, so a multi-letter designation may look funny).
You can save your squad parameters in a tab-separated text format, for example to load the values into a spreadsheet program. Use the "Export" button to do this. You will be asked for a file name to save the squad in.
There is no import functions in this program.
"Print Squad" lets you print the squad info in a layout similar to the original mission log sheets provided with Ambush!.
You can edit all the values for your soldiers in the two large lists to the lower left. Each soldier card shows the same items. You can edit them in any order.
As the author of this page I take no expressed or implied responsibility for the content of external links; opinions expressed on such pages are not necessarily mine. The web space provider is not responsible for the contents of this page or any linked pages.
Written and published by Lutz Pietschker. Please send comments about technical problems to the
site master.
-Made with a Mac!-
, last change 2011-03-12