
Memoir44: Operation Archery
Author:
Lutz Pietschker
Version: 2005
Games
|
Memoir44 House Rules
|
Home Page
|
Links
|
What's New
[Norway] Operation Archery
The Raid on Vaagso, 27-December 1941
The scenario was only playtested solitaire. I would be interested in reports about game balance, problems during play, rule problems etc. See
Designer's Notes
for revision information. There is also a
replay available for download.
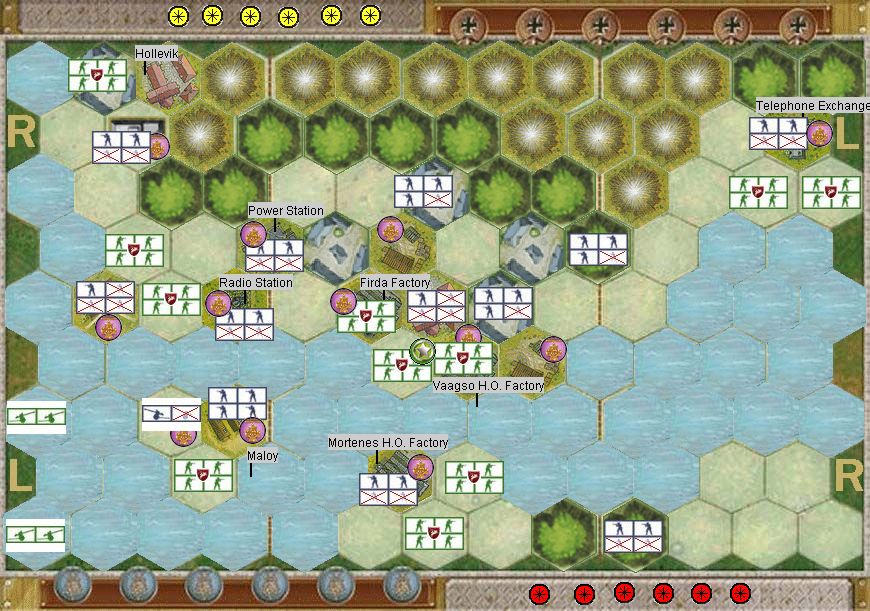
The top of the map (German side) is in the West-North-West, the British support ships (represented by artillery units) are in the South.
There is a problem with this scenario: It can not be set up with the terrain tiles provided in the game and its expansions. For more information please see the set-up section, below.
Historical Background
Note: See the
Designer's Notes
for more reference material. I am using the place-names as used by the British military at that time even though they have only a loose connection to what the Norwegians themselves call the places.
During World War II, the British performed several raids against German-occupied Norway. The first such raid was "Operation Claymore" (March 4th, 1941) against the Lofoten islands. The success of this raid set the stage for "Operation Archery" and "Operation Anklet", against Vaagso (Vågsøy, about 160 km north of Bergen) and the Lofoten islands, from December 26th to 28th, 1941.
"Operation Anklet" is often described as a diversionary action for the Vaagso raid, though it is impressive in itself and probably was so also for the Germans: About 1000 soldiers landed practically on the doorstep to Narvik, destroyed communication equipment, two fish oil factories, an armed trawler, 18000 tons of merchant shipping and 3600 tons of stores nearly unopposed. They then spent two full days and nights in the town of Reine before leaving again, taking with them 228 German prisoners, 314 Norwegian volunteers and 8 "quislings", plus parts of an "Enigma" encryption machine. Only one British soldier was wounded (through an accident).
However, as a game scenario
"Operation Archery"
is far more interesting. On December 27th, about 570 commando and 12 Norwegian soldiers landed in Vaagso (Vågsøy), supported by the cruiser "Kenya", four destroyers and RAF bombers and long-range fighters. Their objectives were to get control of the town of South Vaagso (Måløy) and cut off reinforcements, to subdue the coastal batteries and German units on Maaloy Island (Moldøen) and to eliminate a strongpoint at Hollevik (Holvik). When this was achieved, fish-oil production sites and radio sites should be destroyed.
The landing was done at dawn (about 10:00) as planned. However, resistance was stiffer than expected because German East front veterans were in the town on Christmas leave. Also, a stray smoke bomb from a British bomber hit one of the landing craft and wounded about 50 troops. Despite this, the British got hold of the town in hard house-to-house fighting, sometimes supported by local citizens. By 14:00 the troops could withdraw, having destroyed four factories, the fish-oil stores, ammunition and fuel stores, the telephone exchange and various military installations, while the naval ships had sunk 10 vessels. 22 British and Norwegian men had been killed and 57 wounded, and 8 RAF bombers had been lost. On the other hand, at least 120 Germans had been killed, 98 were taken prisoner, and a complete copy of the German Naval Code had fallen into British hands. In addition, several quislings were taken back to England, plus Norwegians willing to join the Norwegian army in exile.
"Archery" and "Anklet" were not only successful in a tactical sense but they really achieved a strategic objective. Hitler was lead to believe that a British invasion on Norway was a real danger and diverted more than 30.000 troops and 6 big warships (including "Tirpitz") to Norway.
Set-Up
Terrain used:
-
41 x All-water (see below)
-
13 x Hills
-
13 x Mountains
-
5 x Town/village
-
2 x Village/Church
-
1 x Barracks
-
1 x Power plant
-
1 x Lighthouse
-
2 x Radio Station
-
3 x Factory
-
2 x Fuel/Stores
-
1 x Bunker
Tile replacement suggestion:
The blue all-water areas can be simulated by any water tiles. However, the board looks a lot better if you cut the areas from blue cardboard to cover the board's original terrain: Assemble a few tiles on the cardboard in the desired shape, mark the outline with a pencil, and cut it out.
The set-up uses more landmark hexes than provided with the game. Since no special rules are in effect for "building" areas (all town, church, barracks, radio, factory and power plant tiles are treated as "town/village" tiles for game purposes), replace missing tiles with any tile that suggests a built area.
Of course you can, as I did, simply use the
VASSAL M44 module
to play (this is a slightly modified version of the
original module
by Stan and Carl Hilinski and Bill Bennett). You will find the scenario in the File/Scenarios/Extra Scenarios menu of the module.
Briefing
The British player plays with 5 cards and goes first.
The German player starts the game with 4 cards. His hand is reduced to 3 cards when the British destroy (i.e. win the VC token for) the Telephone Exchange. The reduction is done by not drawing a replacement card after the next German turn.
Conditions of Victory
Each eliminated British unit or heroic leader counts as one victory point (VP) for the German player. The German player wins immediately whenever he has won 6 VP
and
at the same time has accumulated more VP than the British player.
Each "Victory Cross" token earned by a successful demolition counts as one VP for the British player. The British player wins immediately when no British infantry unit is left on the board
and
he has won at least 6 VP.
In other words, the British player must try to destroy at least 6 targets as fast as possible and then withdraw, losing no more than 6 units or leaders in the process. He can balance excessive losses by destroying more targets. The German player must try to eliminate more units than the British player can destroy targets and continue to do so until 6 units have been eliminated.
Special Rules
All-water hexes
may be entered and used according to the following rules:
-
Any unit may enter an all-water hex (this represents entering a boat or landing craft).
-
Once sea-borne, the unit may move 1 hex per turn as by normal ocean movement rules. The movement from an all-water hex to an adjacent land hex follows normal movement rules.
-
Units in all-water hexes may not battle, but may be fired upon.
-
Units in all-water hexes can not retreat, they must take casualties when a Flag is rolled against them.
Mountain hexes
are impassable terrain and block LOS completely.
All British infantry units
are special forces (commandos); they may move 1 or 2 hexes and still battle. In addition,
they may battle from a town hex just entered. However, they are not exempt from the mandatory stop in town hexes just entered.
The British unit marked by a Battle Star is accompanied by a
heroic leader
(see Terrain Pack rules for details).
British artillery units
represent naval forces (the cruiser "Kenya" and some destroyers). They move and fire by normal artillery rules except that
-
they may not enter land hexes and
-
they may only fire at units in line of sight.
The German artillery unit
may not move (it represents emplaced coastal artillery), but behaves normally otherwise.
Demolition:
British units must destroy certain objects to gain victory points. This can be done only by
infantry, using this procedure:
-
A unit trying to demolish a target must be in the target hex. It does not suffer any ill effects from the demolition result.
-
Demolition attempts count as "Battle" actions, i.e. they can only be performed by units ordered to battle or allowed to battle by a Tactics Card. Demolition may
never
be attempted if the unit moved in the same turn, but a card may allow it to move after the demolition attack. Any card that allows a unit to battle (including "Firefight", "Behind Enemy Lines" etc.) also allows a demolition attack if its other conditions are fulfilled, and any battle dice advantage is also given.
-
To attack a target, the unit rolls
two
dice. Any Grenade, Flag or Battle Star result rolled destroys the object; any other result does no damage.
-
When the unit destroys the target, the British player is awarded the Victoria Cross token placed on the target. The tokens are never lost, whatever happens to the unit afterwards.
-
Each unit has an unlimited number of demolition attempts. Previous success or failure does not influence later demolition attempts by the same or any other unit.
British Withdrawal:
The British player may, at any time, withdraw units to save them and thus deny the German victory points for unit elimination (see "Conditions of Victory", above). To withdraw a unit, it must have entered an all-water hex in a previous move. If ordered to withdraw, the unit is then simply removed from the game board (it has gone back to the ships). A withdrawn unit can not enter the game again.
The "Behind Enemy Lines" card allows a unit to move twice per turn. This is the only way to withdraw a unit situated on a land hex in
one
turn (assuming the unit can reach an all-water hex with the first move).
Designer's Notes
This scenario is fast-playing and rather a slugfest because the units have contact from the first moment. No careful building of hands, it's just "us or them", and using the chances the cards give to you to their best effect. Maybe it is a little tile-heavy for such a short play, but since I played it only through VASSAL that did not bother me a lot.
The
scale
of this scenario is very roughly 400 metres per hex. One unit figure represents about 10 men. Here is an impression of how the game map is overlayed on a map of the area (map is from the
official 2005 tourist brochure
that also has other interesting maps and photos):
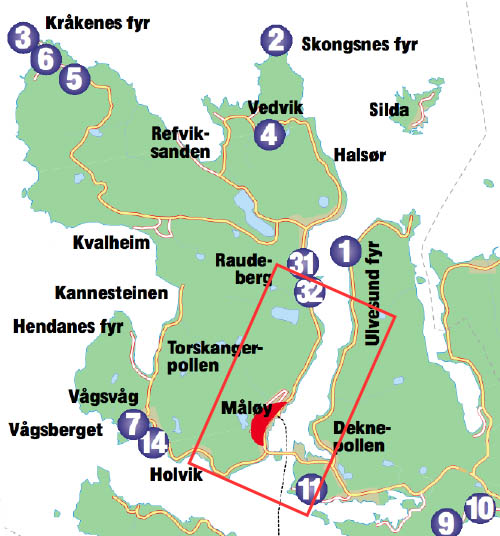
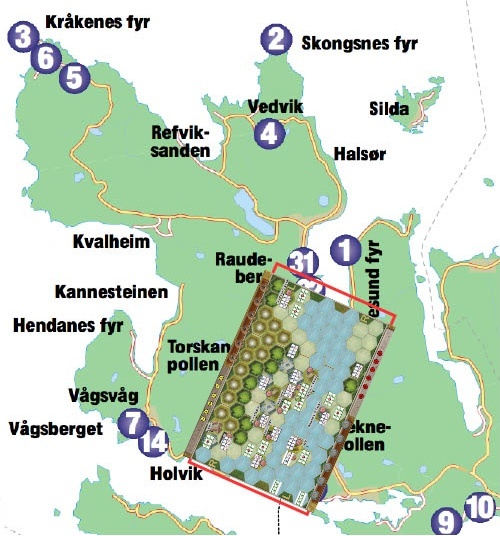
The town of South-Vaagso is on the north-western coast of the fjord, Maloy island in the middle of the southern entrance to the fjord running SW to NE. (Again, please note the differences between place names as used by the British and the official Norwegian names.)
And here is a panorama view of the area, taken from the mountains in the middle of the German side of the board towards the south-east:
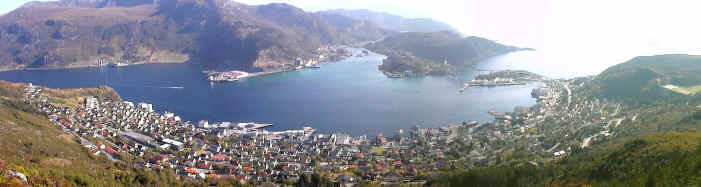
The bridge crossing Maloy island (to the right) and the dam to South-Vaagso did not exist at the time of the raid. The red-roofed factory across the water, in the left middle of the image, is where the Mortenes Herring Oil Factory was. You can
download a much bigger panorama image (1,5 MB).
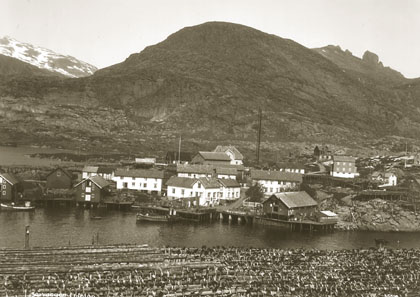
And here is an impression of what Vågsøy and other towns like it must have looked like in 1941:
Links and References
-
Wikipedia article "Operation Archery"
-
Wikipedia article "Operation Anklet"
-
Wikipedia article "Operation Claymore"
-
Official report about the "Operation Archery", submitted 7th Jan. 1942, as published in the London Gazette on 2nd of July 1948 (PDF, 120 kB)
-
Young, Peter: Storm from the Sea (London: Kimber, 1958) (Peter Young is a military historian and one of the officers in the raid.)
-
Devins jr, Joseph H.: Vaagso Raid (Philadelphia: Chilton Book Company, 1968)
-
Chapters dedicated to the Vaagso and Lofoten raids are also in
-
Holman, Gordon: Commando Attack (London: Hodder & Stoughton, 1944)
Detailed description of "Operation Anklet"
-
Saunders, Hilary St. George: The Green Beret (London: White Lion, 1949&1972)
-
Eshel, David: Daring to Win (London: Cassell, 1993)
-
Official 2005 tourist brochure
of Vågsøy (PDF, 6.2 MB)
The coat of arms of the Vågsøy municipality looks like this, indicating the seafaring history of the region:

Revision History
-
2006-03-16: First published prototype.
-
2006-03-18: New overview map and tourist brochure link, added not about British artillery only firing at targets in LOS
-
2006-03-24: Minor editorial work, corrected link
Please note that this scenario was not approved by Richard Borg or
Days of Wonder, so you have to check yourself about playability, potential gaming issues, etc.
As the author of this page I take no expressed or implied responsibility for the content of external links; opinions expressed on such pages are not necessarily mine. The web space provider is not responsible for the contents of this page or any linked pages.


Written and published by Lutz Pietschker. Please send comments about technical problems to the
site master.
-Made with a Mac!-
, last change
2011-03-12