Paper Models
Salvatella Cosmos: Building Styles
Author:
Lutz Pietschker
Version: 2018-05-15
Paper Modelling
|
Home Page
|
Links
|
What's New
General Information
-
Title: Recortables Historicos Cosmos ("Cosmos" historical cut-out models)
-
Publisher/Designer:
Miguel A. Salvatella S. A., Spain; designer: Jose M. Moreno
-
Scale:
not given, approx. 1:50 (?)
-
Size (built, l x w x h):
see individual model
-
No. of Sheets
per model: 16 sheets 315x215 mm
I have built 3 models of the series:
The instructions are in Spanish and quite short. Each model has a 4-page insert with historical information (also in Spanish).
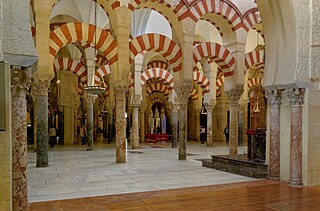
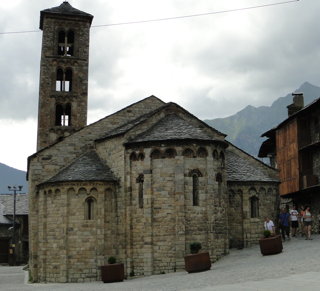
The models do not exactly represent actual buildings, they are "excerpts" from typical buildings of that period and style, designed to show the typical style elements. Here are some illustrations I have drawn from the web that show original buildings in the styles covered by the models:
The models were unusual for me insofar as they do not have numbered parts (a common method in German, Polish and British models I have built), but the numbers are associated with the part connections (glue tabs). There is neither a detailed step-by-step instruction nor detailed illustrations; the little instructions that are there are in Spanish. Proceeding roughly in the sequence of tab numbers and occasionally checking against the cover illustration mostly works fine, but not always:
- Be sure that you understand the construction fully before you start to apply glue! (Well, this is true for any model, but crucial here; these are "thinking man's models". Or women's, of course)
- I found the printed parts very precise, i. e. very well fitting each other. I was less impressed with one other aspect of the printing, namely the occasionally wrong use of the different line types, because ….
- … not all tabs show the correct line type! In particular, some lines are dashed ("score") when they should be solid ("do not score"). Do understand how the parts fit together before scoring!
- The paper holds it shape well once formed, but it absorbs a lot of water from the PVA glue. This may lead to some warping. It is usually only temporary and straightens out once the glue is dry, but I guess the paper is meant for other (water-free) kinds of glue. All in al, though, l I still prefer PVA. Make some gluing tests to decide for yourself!
- I mounted the bases on 3 mm foamcore board (KAPA brand), using spray-on contact glue. The foamcore board is a very convenient material (I also used it for reinforcements), but I swear that this was the last time I used spray adhesive. What a mess I created! Undoubtedly I have to put that down to my lack of experience, since others use that sort of glue without problems, but I'll switch back to out-of-the-tube contact glue (Pattex).
Picture Gallery & Model-Specific Notes
(Click image to show it in large size.)
El Islam – Moorish style (#9 of the series)
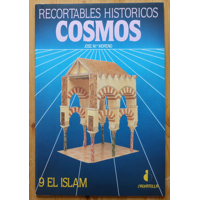
The model shows part of a hypostyle (i. e. column-born) hall ceiling and roof in the moorish style of architeture, "moorish" referring to the North-African muslims who had occupied most of the Iberian peninsula for some centuries. Of the three models, this one comes closest to resembling an existing building, namely the prayer hall of the Mosque–Cathedral of Córdoba, or "Mezquita" (i. e. "the Moorish one") for short.
Model notes:
 |
|
To the left, the cover of the model sheet binder.
xxx |
| |
|
xxxxxx.
|
| |
|
xxxxxx
|
| |
|
xxxx.
|
Medieval – Romanesque Style (#12 of the series)
Note: Another fine model I built of an Iberian romanesque church is Santa Maria del Naranco (Spain, province of Leon). That church has no tower, possibly because it was, originally, a sort of king's hall and was only later consecrated. And, to be precise, it is in fact pre-romanesque.
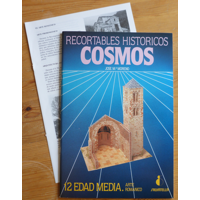
This model is huge. It shows the apse, eastern gable wall and tower of a typical (i. e. stylized) romanesque church. The orientation, if it follows the convention of the time, would be that the apse points eastward, making the tower side south. The western part of the church, with the main entrance, is missing from the model.
Model notes:
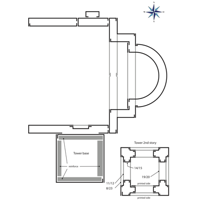
- See my help file to get an impression how the parts fit together and what is glued to what.
- I reinforced the lower part of the tower (tabs 1-4 bottom/7 top) with pieces of stiff cardboard to get a solid base. It just seemed to wobbly without. You can do the same to the square 1st floor base (the part with the staircase), but better do it after mounting the 2nd floor on it. The staircase looks better if you shade the steps to give an impression of "depth", a soft pencil works fine for that; on the other hand, once assembled you don't see much of it.
- For the 2nd story of the tower I did not follow the tab order; to be honest I see no way to assemble it from its outer walls, working inward and finally adding the core. Also, I pre-assembled the complete 2nd floor up to the roof before mounting it on top of the lower tower part because assembling the 2nd story on the full model, 25 cm in the air, is rather unwieldy.
- Glue the embrasures/arches (lower = 15, then upper = 14 is easiest) to the white back of the inner tower core(19/20).
- Now fold and close the tower core.
- Add the capitals (16) and then the columns (upper = 17, lower = 18).
- Add the recess arches (13) to the the recessed fronts (lower = 12, upper = 11). Note: The two end tabs of each arch (13) should not be scored as they connect tangentially to the embrasure.
- xxxxx
- xxxxx
- Mount xxxxxxxx to the "staircase" base.
- Glue the outer wall (9) to the pre-assembled core, one side after the other. Check the alignment of inner and outer wall frequently.
- Assemble and add the tower ceiling & roof.
- Now put the complete assembly on top of the lower tower walls.
- Proceed with the walls in the order given below, you can "interlace" this with the assembly of the upper tower:
- Southern walls 24 (insert tower door 29 first!) & 25. Note: Better reinforce all wall parts connecting to the front wall, otherwise there is a risk that they "cave in" while being glued to the front wall, a situation from which it is difficult to recover. Next time I would reinforce all big, floppy parts (see help file) or insert a rectangular piece of foamcore int the wall ends.
- Northern wall and buttress parts (62 + 63, 64); use a set square to make sure the walls are vertical.
- Glue the halves of the arched fronts 34/35/36/37 and 41/42/43/44 together. Take care that the verticals are parallel and that the base score lines are on one axis.
- Form and glue with itself the inner dome of the apse (54).
- Glue the inner arch to the inner arch front (46/47 to 51). Nte: Maybe reinforce the front wall after this.
- Glue that assembly to the inner front wall 34/35/36/37.
Note: I started with the long straight tabs 45; in the end I had to slit the arch in the middle to make it fit; I covered that 1 mm gap with a "keystone" strip I made myself.
- Glue the apse 54 to that assembly. Start with the long straight tabs (52).
- Glue the complete assembly to the base and the southern (33) and northern (62) walls. I started with tabs 33 to 37 in ascending order, then 54 & northern wall, then 46/47, and finally the apse itself (51).
- Add the outer parts of the front gable wall (41-44). I reinforced the piece before gluing it to the base.
- Form the outer apse wall (61) and apply the slit windows (68, 70, 72 – blacken the white "slit" face as you are looking into the dark interior here). Glue the assembly to the small gable wall (55/56). I reinforced the gable wall before the assembly.
- Mount that assembly to the base and against the front wall (57/58).
- Add the roofs, starting with the the narrow roof covering the large frontwall, then the straight apse roof and finally the round apse roof. For the two straight roofs you may consider gluing in distance pieces to stabilise the gable walls (i. e. to make sure they stay parallel), in particular if you did not reinforce those walls.
I do not claim that this is the ideal way to do it, but it worked for me. There were some cover-ups to do (mostly because, in fact, I did not use the sequence I outlined above), but a bit of "glue welding" and some watercolour took care of that.
 |
 |
To the left, the cover and the 4-page insert with historical information (in Spanish).
To the right, a drawing I made myself to be sure I fully understood what goes where (the "help file" mentioned above). |
| |
|
xxxxxx.
|
| |
|
xxxxxx
|
| |
|
xxxx.
|
Medieval – Gothic Style (#14 of the series)
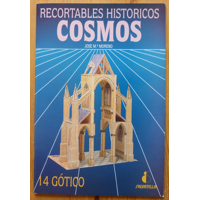
The model shows a "slice" from the middle of the nave of a typical gothic church, including the roof construction and flying buttresses but omitting towers, apses and entrance front. The model does not represent any particular existing church (as far as I know – the stained-glass windows may point to a real church, but I am not enough of an expert to find out). Rather, I think it shows typical elements in a stylized manner.
Model Notes:
 |
|
To the left, the cover of the model sheet binder.
xxx |
| |
|
xxxxxx.
|
| |
|
xxxxxx
|
| |
|
xxxx.
|
As the author of this page I take no expressed or implied responsibility for the content of external links; opinions expressed on such pages are not necessarily mine. The web space provider is not responsible for the contents of this page or any linked pages.


Written and published by Lutz Pietschker. Please send comments about technical problems to the
site master.
-Made with a Mac!-
, last change
2018-05-22
