Paper Modelling: Technical Hints
Author:
Lutz Pietschker
Version: 2011-03-12
Paper Modelling
|
Home Page
|
Links
|
What's New
Techniques for Paper Modelling
Parallel Lines
-
Basing models
-
Terrain Modelling
-
Triangular Terrain Meshing
-
Mounting Paper on Cardboard-
Algebra
This section is meant to collect some experiences I made while building models. They do not make any claim for originality, completeness, correctness in a universal sense, or whatever. They may well come from other sources I do not remember (otherwise I would quote them, of course). They may even be completely wrong (if so, please
tell me). And never forget: Bring your own thoughts when building paper models!
Cutting
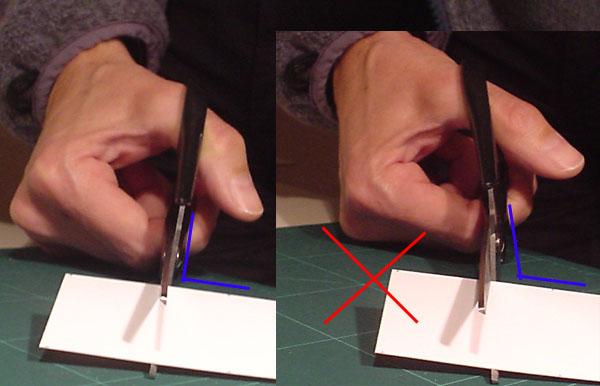
A mistake many people (including myself) make when cutting with scissors is to hold the blade in an oblique angle to the paper. You get the best results when the scissors blades are perpendicular to the paper, otherwise you may get tapered or frayed edges and may even experience splitting cardboard layers (if the cardboard was cheap). Especially when cutting rounded contours keep an eye on this and check yourself regularly; it is easy to develop a bad habit!
To be sure, there are cases when you want to cut at an angle, for example to hide the cardboard edge. In such casees it is better to use a knife than scissors. And talking about knives: Depending on how the blade is designed, it may be necessary to guide the blade at an angle to get a vertical cut. The technique is discussed here.

Obviously, you can make the same mistake with a scalpel.
Parallel Lines
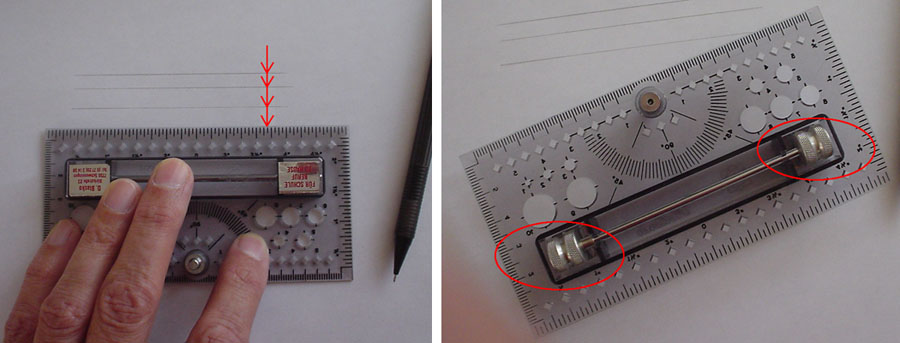
This one is so simple I thought everyone knew it, but it turned out some did not: To draw (or cut, or score) parallel lines, use a set square (drawing triangle) plus a ruler. Leave the ruler in place while sliding the set square along its edge. It helps if the ruler has a rubber underside so it does not slip easily.
There is also an ingenious tool for drawing parallels, drawing centre lines and even circles. It is a small ruler with built-in rollers and a compass pin:

Mine is by Dr. Blasko, Schwenningen, Swabia, and I bought it at some trade fair; in my experience this is the place where all such tools are bought. You seldom see them in shops, and certainly not when you are looking for them.
Basing Paper Models
One of the big problems of paper models is to base them in a way that the base contributes to the strength, shape and beauty of the model. Unfortunately, many basing materials detract rather than contribute. Here is a short list of materials I used or heard about (take a look at some of them on the
Modulor website):
-
Thin Cardboard
Very good and easy to use, but it demands a sophisticated model structure, else it will warp. You should not use a single layer of this material for terrain that surrounds the model because it has no inherent stability and will bend where it is not stabilised by the model structure itself. Of course, you could also use it in layers to make your own "sandwich board" (see below).
-
Thick Cardboard
Similar to thin cardboard, it warps nearly as much and is harder to cut. I do not like it much.
-
KAPA boards/Foamboard/Leichtstoffplatten
This material consists of two layers of cardboard with Styrofoam in between. It comes in 3-20 mm thickness (600-960 g/square meter), in different colours and even with self-adhesive surfaces. Very easy to cut, warps very little, unbelievably light, a real "wonder material", and not even very expensive in the quantities we need- in short, my preferred material. When possible, I use this in 6 to 10 mm thickness. By the way, I also use this to make boards for board games.
-
Sandwich/Honeycomb Cardboard
This is cardboard arranged in layers, with a honeycombed interior structure. The surface is brown or white cardboard. Available in 10-40 mm thickness (300-4000 g/square meter), light and very stable. In my experience it does not warp at all, and it is very easy to work with. However, the cut edges are rough and must be dressed with a strip of cardboard or tape.
-
Plywood
Light, and if cut with a sharp saw the edges look very good (especially when painted with clear enamel), but it tends to warp (if you do not use very thick, and therefore heavy, boards). If you paint it, paint both faces, or a warp is guaranteed!
-
Chip Board
Good, no warping, cheap, but heavy, and the edges need some dressing. Can be used if KAPA or sandwich cardboard is not available.
-
Glass
Hard, does not warp, heavy, nasty if dropped. Makes a splendid surface for a temporary base, for example while building models that will be transferred to a different base later, or for models to be displayed in art (or other) galleries.
Terrain Modelling
This section addresses the question of how to model the terrain that surrounds architecture models- the rocks around lighthouses and castles, for example. Below is a description of some established techniques. The purpose is to give you an idea what others did and, who knows, maybe to come up with ideas how to improve the terrain modelling of bought models or even of your self-designed models.
-
No Terrain
Found in very simple models. The terrain is cut off, ignored, does not exist- sometimes together with parts of the modelled object (like missing lower parts of the walls or towers of castles). Sometimes this even gives a wrong impression of the object itself (as in the model of the
Alte Wasserkunst Bautzen
where a third of the tower height has been sacrificed on the altar of simplicity).
Other example:
Le Cathedrale de Le Puy
(L'Instant Durable)
-
Printed Terrain
The terrain is not modelled in 3D, but an attempt has been made to give an impression of the terrain by printing rocks, trees etc. on the flat object surfaces (for example, on the castle walls). The impression can be actually rather good if very good graphic design or even photo-realistic design is used. Still, a technique with a bow to the modeller who likes his models easy to build (and sometimes a designer who does not care a lot).
-
Slab-Structured Terrain
In this case the terrain is modelled by large, flat surfaces that give a 3D impression of the hill, rocks or whatever is there. If coupled with good graphics, this is more or less the state of the art in cardboard terrain modelling. Found on every sophisticated model that needs terrain structure. The "slab faces" also contribute to the static of the model, i.e. its structural stability.
Example:
Wizard's Castle
(Usborne)
-
Crumpled Terrain
A very original idea by L' Instant Durable, used for example in their gorgeous "Mont Saint-Michel" model. The instructions just say "for best results, use you hands and fingers to crumple the paper before shaping them into their final form" (fortunately they did not give instructions to use the feet :-). Together with the colours printed on the cardboard the result is a surface that gives a very good impression of a rocky surface. I have the notion that the technique could be adapted to put a layer of crumpled paper on top of "slab-structure" terrain to improve the surface impression while keeping the structural stability the "slab" faces provide.
-
Sculptured Terrain
This is the technique used by model railroad builders, uses any available material like putty, plaster etc. and as such is not a "pure" cardboard modelling technique. The "how-to" has been described often, and much better than I could do it. I mention it here only because even the "pure" the cardboard modeller can get a lot of ideas and inspiration from good sculptured terrain. Sometimes a bit of sand, sawdust or similar, "flocked" on the cardboard surface, can achieve real good effects and improve the look of a model vastly. Keep your eyes open and decide how far you want to go!
-
Triangle-Mesh Terrain
This is actually only an extension of the "slab-structure" method, inspired by the triangular "meshing" of surfaces to prepare them for finite-element analysis (FEM) of tensions and deformations. The basic idea is that any 3D surface can be modelled with any desired degree of accuracy by splitting it into triangles of the appropriate size. The more "irregular" the surface is, the smaller the triangles must be to come close enough to the actual surface.
Example:
Nuremberg Castle
(Altstadtfreunde Nürnberg e.V.)
I put a description of the technique, together with some construction aids, on a
dedicated page.
As the author of this page I take no expressed or implied responsibility for the content of external links; opinions expressed on such pages are not necessarily mine. The web space provider is not responsible for the contents of this page or any linked pages.


Written and published by Lutz Pietschker. Please send comments about technical problems to the
site master.
-Made with a Mac!-
, last change
2011-03-12


